There are Christmas cake lovers and haters (see Christmas Cake and a Silly Song), but everyone is sure to like Pecan Christmas Loaf. It’s more like a quick or tea bread than a dense fruit cake, with a bit of red and green candied fruit to give it a seasonal look and taste. My cousin gave me a sample last year and I liked it so much I decided I would try it myself this Christmas.
I’m not sure where or who she got the recipe from, but like many old recipes on index cards, back when people had Recipe Boxes, this one seems somewhat vague. It doesn’t seem like there is enough flour for 2 loaves, but plenty of eggs and butter?
As I only wanted to make one loaf, I decided to cut the ingredients in half and then further adapted the flour according to my Date-Nut Loaf recipe, and a recipe I found online for Pecan Christmas Cake. When I googled most of the recipes were for Butter Pecan Cake, which called for even more butter.
Ingredients for One Loaf:
2 eggs, 3/4 cup of sugar, 1/4 cup of butter, 1 teaspoon of vanilla extract, 1 1/2 cups of pecan pieces, 1/2 cup of dried candied/glazed red and green cherries/fruit mix, 1 1/2 cups of flour with the salt and baking powder already in it, and 1/2 cup of crushed pineapple bits with some liquid.
Mix the 2 eggs, 1/4 cup of melted butter, 5ml (1tsp) of vanilla and 3/4 cup of sugar together.
Add the 1 1/2 cup of pecan pieces and the 1/2 cup of green and red dried fruit mix, and the 1/2 cup of crushed pineapple. Next time I might add 2 cups of the pecan pieces which is what the recipe called for but as I bought my ingredients at the bulk barn I didn’t buy quite enough. I cut back on the dried fruit too, as I don’t like too much of that, and I hate those green cherries, but you can adjust as you wish to make it more like fruit cake. The bulk food store didn’t have any candied pineapple bits, nor did the grocery store, maybe they don’t make it anymore, (although they all seem to have large dried chunks), but I remember my mother adding a whole can of Dole crushed pineapple to her much bigger Christmas cake recipe, so I substituted that. I had to use a bit more of the juice as the batter was too dry.
You can adjust the pineapple/flour to get the consistency you want. See this is how you get vague recipe cards – an experienced cook doesn’t measure, they guestimate!
I always use a glass loaf tin so I can see if I am burning the bottom. The recipe card says oven at low setting 300-325 and bake for 1 1/4 – 1 1/2 – 2hours – how’s that for general vagueness? Everyone’s oven is different, but nothing would ever cook in the middle at that low a temperature in my new oven. I regret keeping it, it’s such a temperamental thing. If I’ve used it the day before, it cooks faster. If it’s sat unused all week, it takes forever. I set it at 350, although I had it at 375 for the first 15 minutes, and it took about an hour. It was perfectly done in the middle, if a bit dark on the edges. I use the regular bake setting, not the convection one, as nothing browns with it.
It was a fairly small loaf, so I wish I had made two, as my cousin tells me it freezes well. I fed some to the snow shoveler right hot out of the oven!
Nice for Christmas Day brunch or with a cup of tea on a cold winter’s night…..but why do I always get the piece with the green cherries?
There are three kinds of people – those who love Christmas cake, those who hate it and those who just want a piece or two, preferably made by someone else. Count me in the later category. Christmas cake was a staple of the season for decades but is now one of those Dickensian desserts which have fallen out of favor, along with mince pie and plum pudding, with many younger people not being familiar with any of them.
My mother used to make Christmas cake every year – one big round pan and two or three smaller loaf tins, and it all got eaten, but by whom I don’t know. Certainly, none of us kids ate it. My dad was fond of it, as was my grandmother, who also made her own, a single round one. Perhaps some of it was given away? It was always passed around on the same gold glass platter after the big turkey dinner, with a few cookies on the side, as everyone was much too full for a regular dessert. It was something to nibble on with a cup of coffee or tea. I also have a memory of my dad enjoying a slice of it on Christmas Eve with a glass of port, while watching midnight mass or A Christmas Carol, and sometimes I would join him. The port was an old family tradition, as he seldom drank and a bottle would last from year to year. Port, which also heralded from Dickens day, is a type of fortified wine like brandy and strong stuff if you’re not used to it.
Christmas cake is a dark fruit cake often made a couple of weeks before Christmas, and tightly wrapped, to give it a chance to age. A friend adds brandy to hers once a week to keep it moist. My grandmother added cocoa to hers to make it darker. It seems every family had a different recipe. As it keeps well, it was traditionally a popular choice for wedding cake. At peek at my mother’s 1945 cooking bible, The Purity Cookbook, has two recipes for dark fruit cake, one for Wedding Cake calling for 12 eggs and 3 and a ½ cups of flour and 8 assorted sized pans, and one for six loaf pans requiring 10 eggs and 8 cups of flour. My mother’s recipe called for 8 eggs, and made one round bundt cake and 2 or 3 loaf tins.
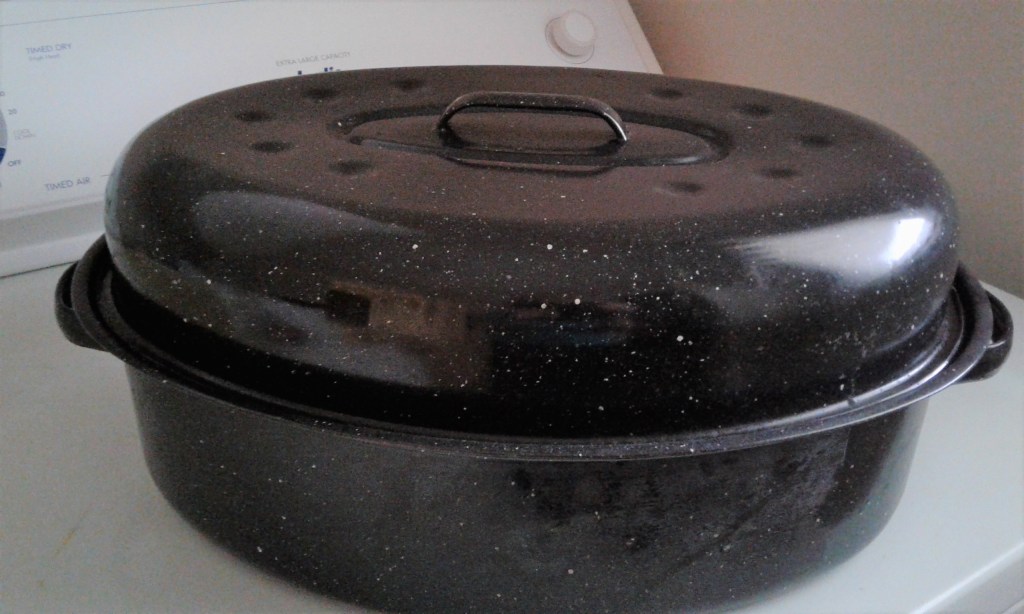
Does anyone remember these?
In mid-December out would come the big turkey roaster, as it was the only thing large enough to mix all the ingredients in. She would usually make it in the evening after supper was done, when I could help if I was home, and my dad would be in charge of adding the rum – “Maybe a bit more” although it’s debatable whether one splash or two would make much difference with so much batter.
Here’s her recipe….sort of….as we last made it five years ago and I wrote the instructions down afterwards in an effort to have something on paper. Like many experienced cooks, her measurements were not exact, but it always turned out good. I believe we froze some of it for the following year, as it freezes well (if you’ve ever found a piece of wedding cake stashed away sometimes the cake lasts longer than the marriage) and gave some away to a snow-shoveling neighbour and a couple of her art friends. It’s always best to ask first if you don’t know what category people are in (see intro) as you don’t want to subject someone to an annual gift of something they have to pretend to like.
So because I had a craving for it this year, (that store bought stuff is dreadful – see song) I decided to attempt a small loaf tin, using the recipe for my Date and Nut Loaf as a starter, (see link), as it is basically a foolproof recipe. I made a rare visit to the Bulk Barn store for the mixed dried fruit as the packages available in the grocery store were almost expired and had papayas (?) in it instead of dried pineapple. I hate those bulk food places – the germs – everyone handling the same utensils – but I sanitized before and after, and tried to avoid the green pieces in the mixed fruit bin as those were the ones I always used to pick out of the cake. I also bought currants there, as what would I do with a whole bag of currents, although I put some raisins in too. (NB: the pioneers never had access to raisins/dried grapes, hence the preponderance of currents in those old recipes.) Total cost about $6, although it could have used a bit more fruit.
Here are the ingredients.
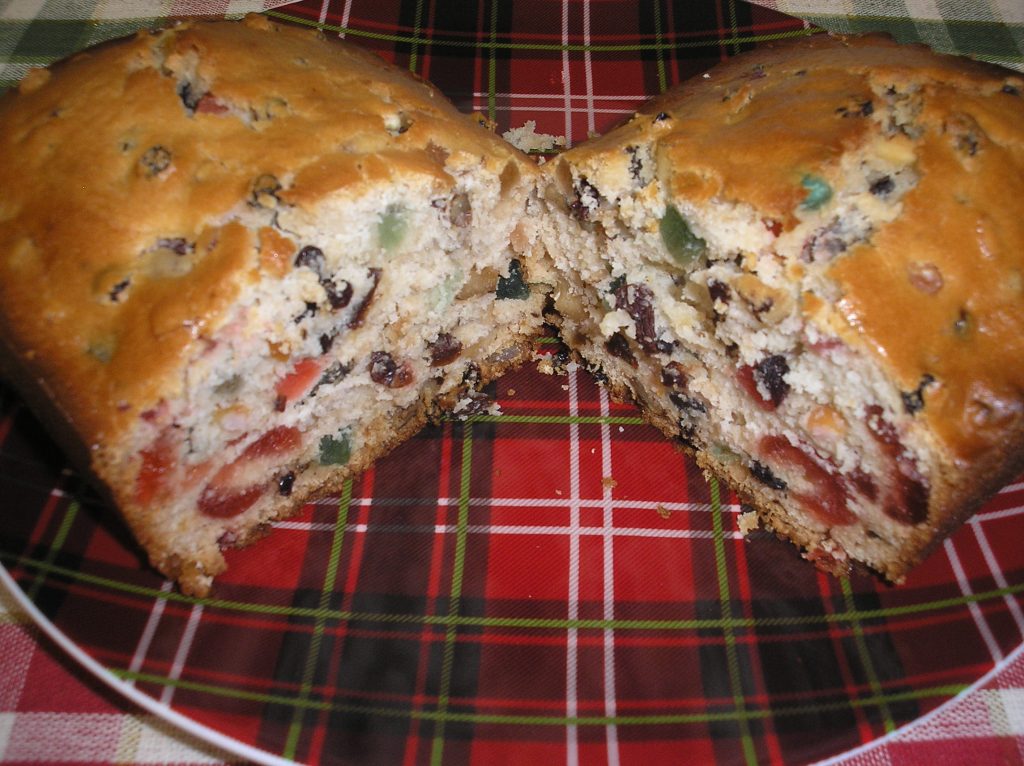
I mixed 2 tablespoons of butter, ¾ cup of sugar, one egg, one teaspoon of vanilla. Added ¾ cup of water to the currant/mixed fruit mixture, (but you could substitute milk or OJ) and a splash of rum – (15ml/1/2 ounce) and added 1 ¾ cups of flour (the kind with baking soda and salt already in it). Plus a smidgen of spices – cinnamon, nutmeg, allspice. The only thing I forgot was the dates, as I didn’t have any, but in retrospect the stewed dates/water mixture would have made it a darker color, as it turned out much too pale, not fruit-cake color at all. I added the walnuts after I had prepared a cute little mini-loaf for a friend who reminded me how much she loves fruit cake but is allergic to walnuts. Baked at 350 for about an hour.
It came out more like a tea bread than a traditional Christmas Cake.
It tasted okay – a bit sweeter than I liked but next time I would definitely add the dates for color, plus more spices, more fruit, less flour and cut back on the sugar a bit. Overall, for a true Christmas cake it needs more work but I would make this again as is for a nice treat with Christmas morning coffee. Maybe this will be the start of a new Christmas tradition!
In the meantime a neighbour gifted me a chunk of her more traditional cake, which satisfied my craving.
Irish pub – theatre set of musical – When Irish Eyes Are Smiling
And now for the silly song – Miss Fogarty’s Christmas Cake – by the Irish Rovers. This was part of the song set of a play I saw last September and was very funny with the animated actions of the actors and Miss Fogarty of course. It’s by the Irish Rovers and the lyrics sum up what Christmas Cake haters think about Christmas cake! Hope you enjoy it!
Miss Fogarty’s Christmas Cake – lyrics
As I sat in my window last evening A letter was brought round to me A little gilt-edged invitation sayin’ “Gilhooley come over to tea” Each Christmas the Fogarties sent it So I went just for old friendships sake And the first thing they gave me to tackle Was a slice of Miss Fogarty’s cake
Chorus: And there were plums and prunes and cherries There were citrons and raisins and cinnamon too There was nuts and cloves and berries And a crust that was nailed on with glue There were caraway seeds in abundance Sure if I’d work up a fine stomach ache That would kill a man twice after eating a slice Of Miss Fogarty’s Christmas cake.
Miss Mulligan wanted to try it But really it wasn’t no use For we worked on it over an hour But a piece of it wouldn’t come loose Till Halley came in with the hatchet And Murphy came in with the saw But Miss Fogarty’s cake had the power For to paralyze any man’s jaws
Chorus:
Miss Fogarty proud as a peacock Kept smiling and talking away Till she tripped over Flanagans brogans And spilt the potcheen in her tea Aye Gilhooley she says you’re not eatin Try a little bit more of me cake “Oh no Mrs Fogarty” said I Any more and me stomach would break
Chorus:
Maloney was sick with the colic O’Donnell a pain in his head McNulty lay down on the sofa And he swore that he wished he was dead Miss Bailey went into hysterics And there she did wriggle and shake And all of us swore we were poisoned From eating Miss Fogarty’s cake
Chorus: And there were plums and prunes and cherries There were citrons and raisins and cinnamon too There was nuts and cloves and berries And a crust that was nailed on with glue There were caraway seeds in abundance Sure if I’d work up a fine stomach ache That would kill a man twice after eating a slice Of Miss Fogarty’s Christmas cake
Yes it would kill a man twice after eating a slice Of Miss Fogarty’s Christmas cake
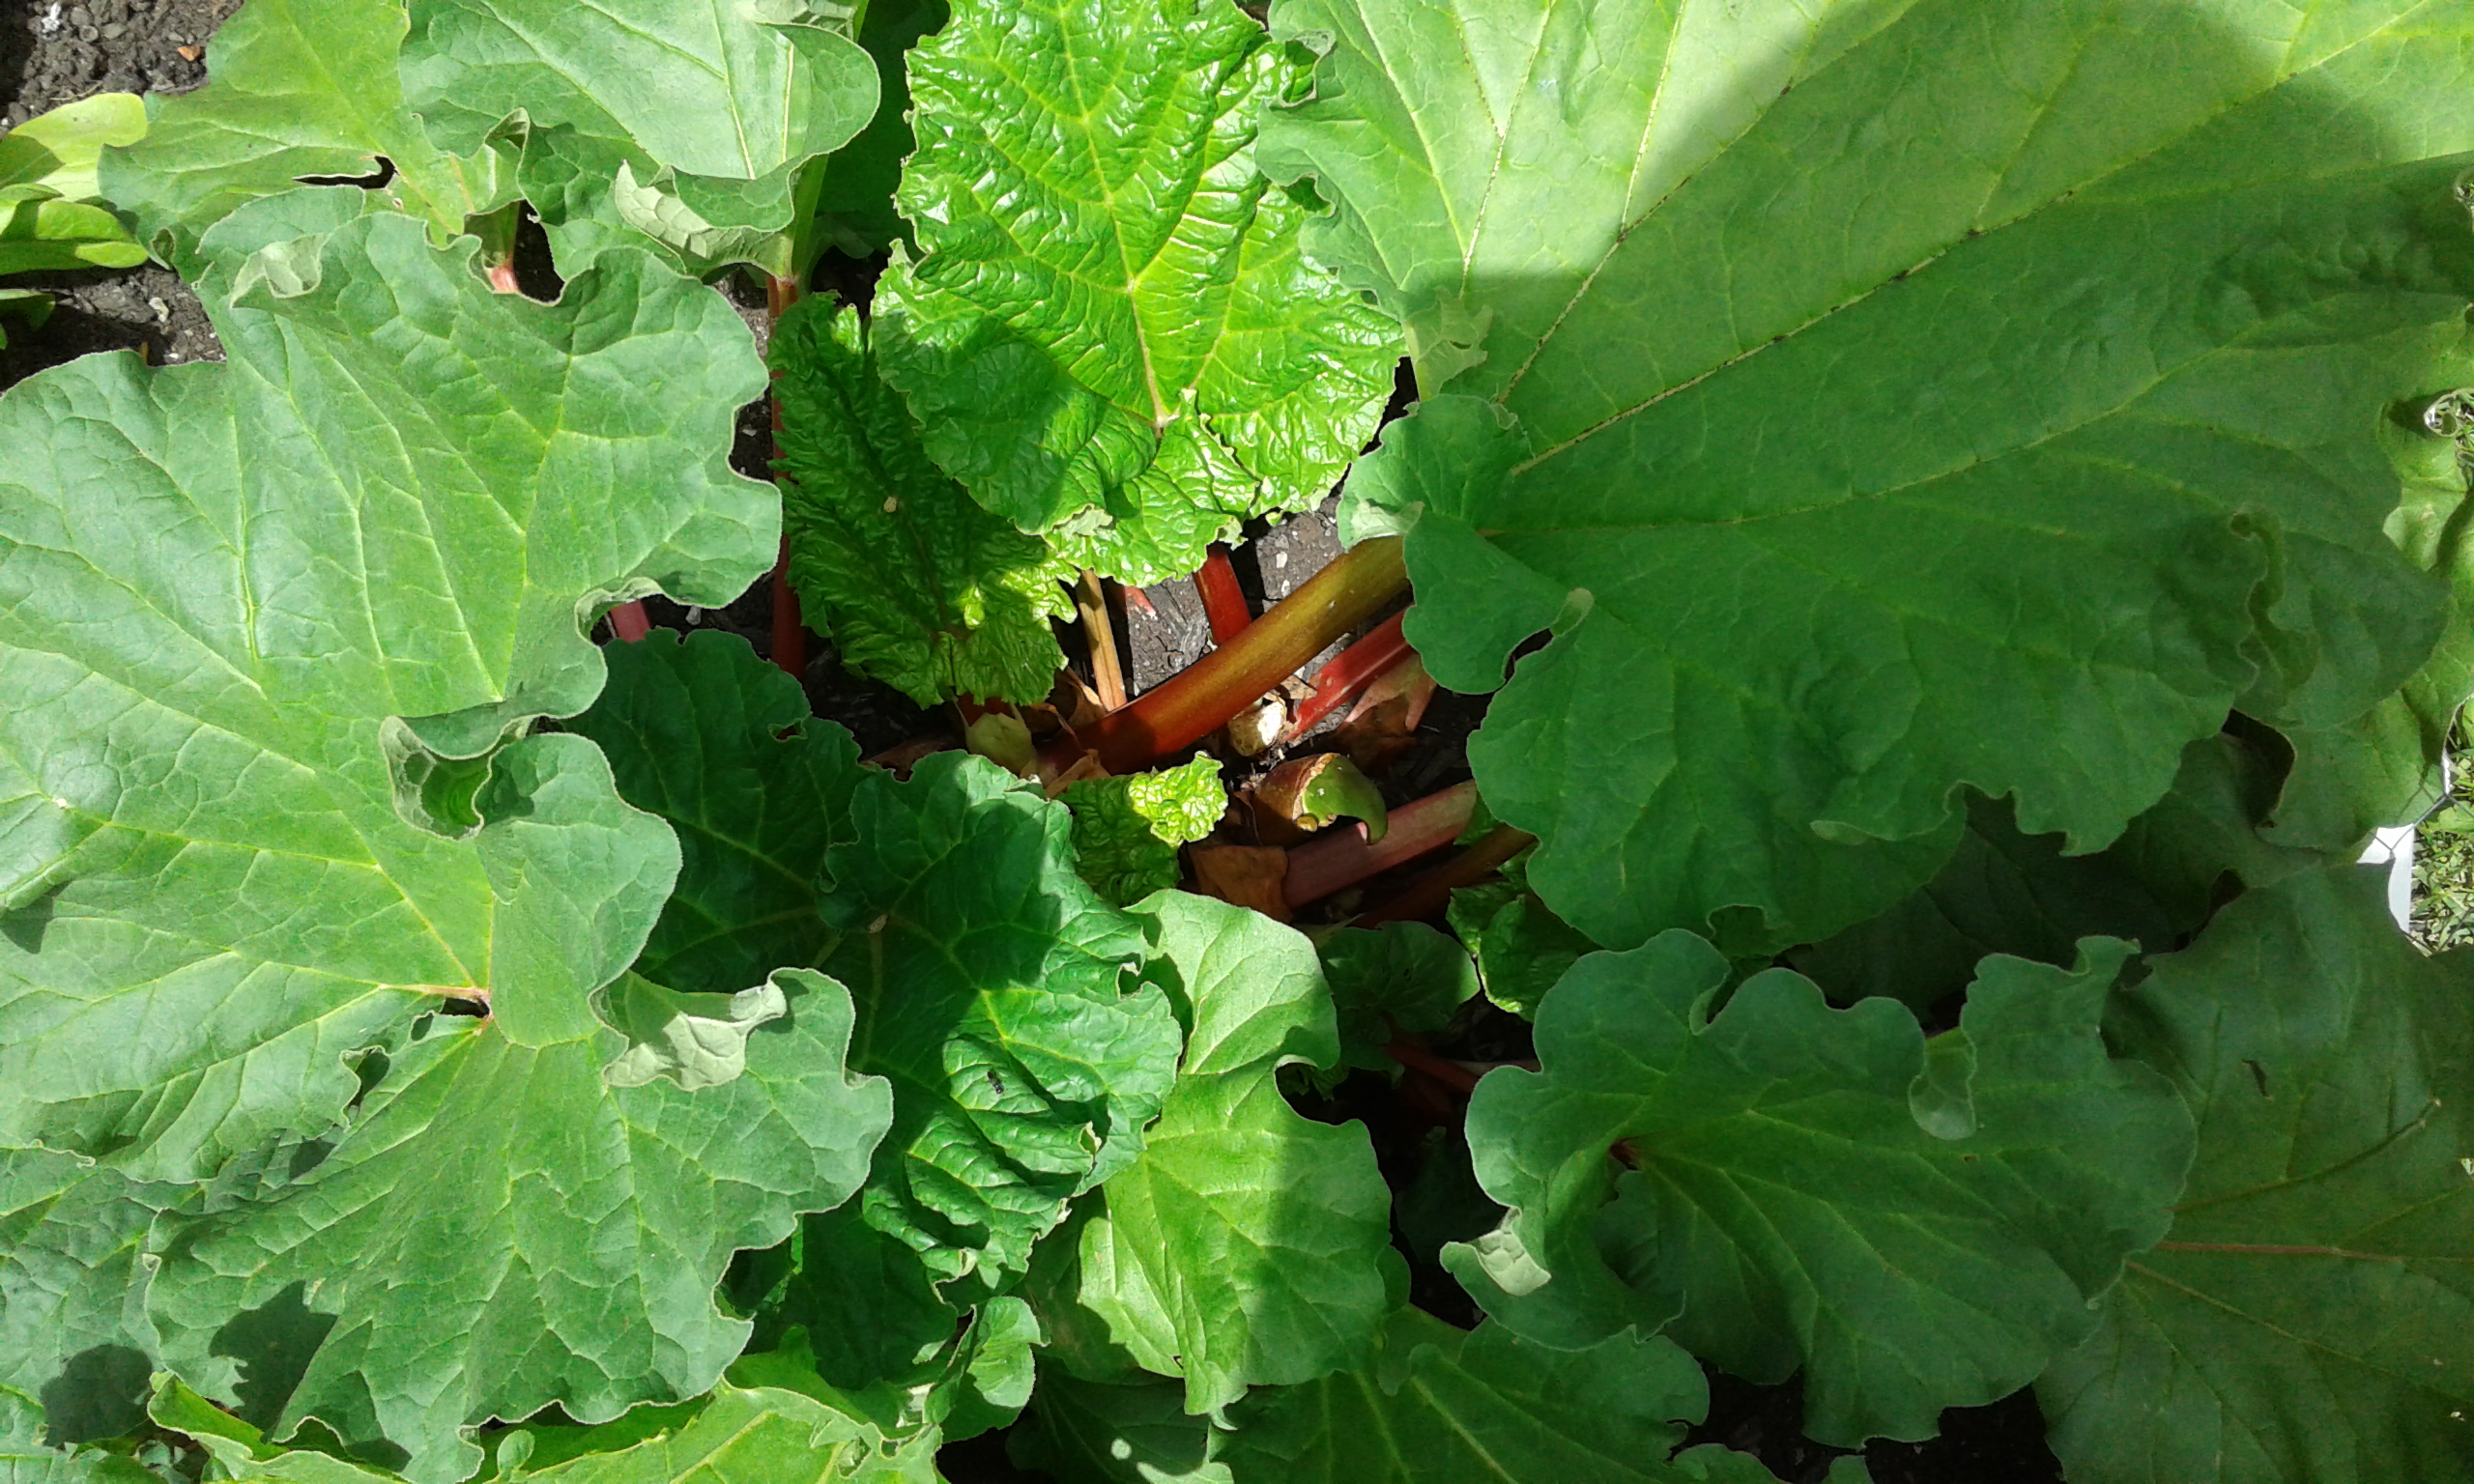
It’s rhubarb season for those of you who are fans of this tart seasonal favorite. Two years ago, I posted a recipe for Rhubarb Lunar Coffee Cake, (recommended for hungry astronauts) and at the end I mentioned that I had just planted some rhubarb. Two years later I have enough of a crop to make my own rhubarb treats. I’ve already harvested twice this year as it got off to an early start and I was able to share some with the neighbors,
and make rhubarb scones.
In that post I also reminisced about our large rhubarb patch on the farm and how it had been there for decades.
Family dogs guarding the rhubarb patch on a lawn sunny with dandelions.
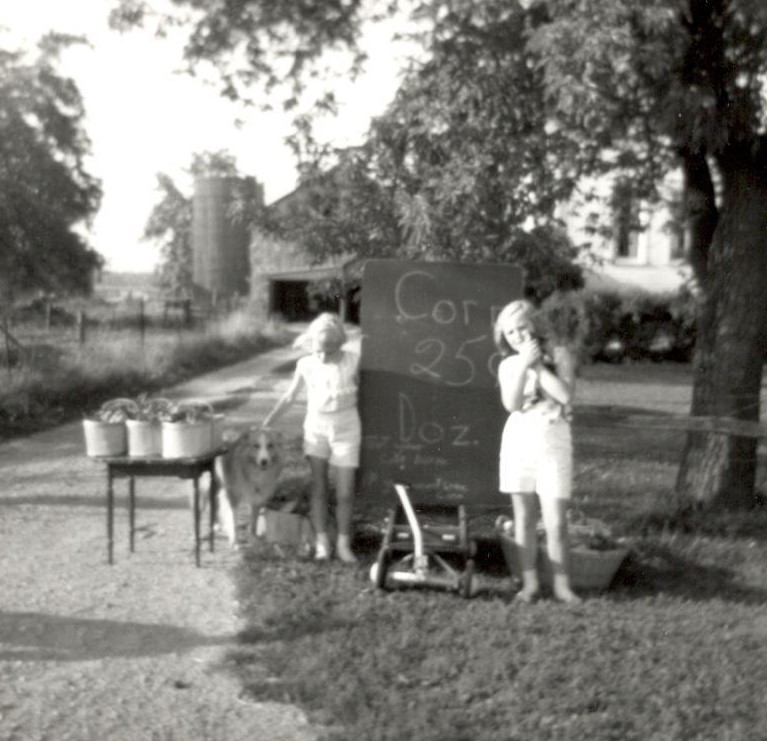
Recently I found the photos of when we set up a rhubarb stand at the end of the driveway under the shade of a big tree.
Four salesmen plus 2 cats and a dog – I’m the blonde beside the dog.
We had a big homemade sign advertising our wares, 25 cents a bunch, similar to this one. It was a quiet country road, so we didn’t have many customers, just a few people out for a Sunday afternoon drive. The profits ($1) were spent on penny candy.
This is making me nostalgic for our dog, King. He was a blonde border collie, (not a Lassie dog like the TV show which was popular at the time but the same color), and I’ve never seen another dog like him since. He wasn’t a cuddly dog, a pat by a stranger was barely tolerated. He was a working dog. His job was to fetch the cows from the back field if they hadn’t come up at milking time (my dad had a dairy farm) and to supervise the children. He was very protective of us, and could be found wherever we were. He could tell time too, as my mother said he would sit at the west side of the house at 3:30 every day like clockwork and wait for the school bus. He was an outside dog and slept in the doghouse or in the barn if it was very cold. One of my earliest memories was of going to pick him out, (I was four) and he died fifteen years later when I was first off to university. He was replaced by the black and white border collie (Shep) in the picture above who was the dumbest dog ever. He was also an outside dog, but the white Samoyed (Ruff), my mother’s empty-nester pet, was allowed inside the house as were later a succession of Golden Retrievers (Fergie, Murphy and Co), who were friendly but annoying in the fact they needed endless attention. I’m also feeling nostalgic about those big old trees which used to line the country lanes before they were all cut down to widen the road. Many farms had horses out in the fields so a drive in the country was a pleasant and scenic experience on a Sunday afternoon.
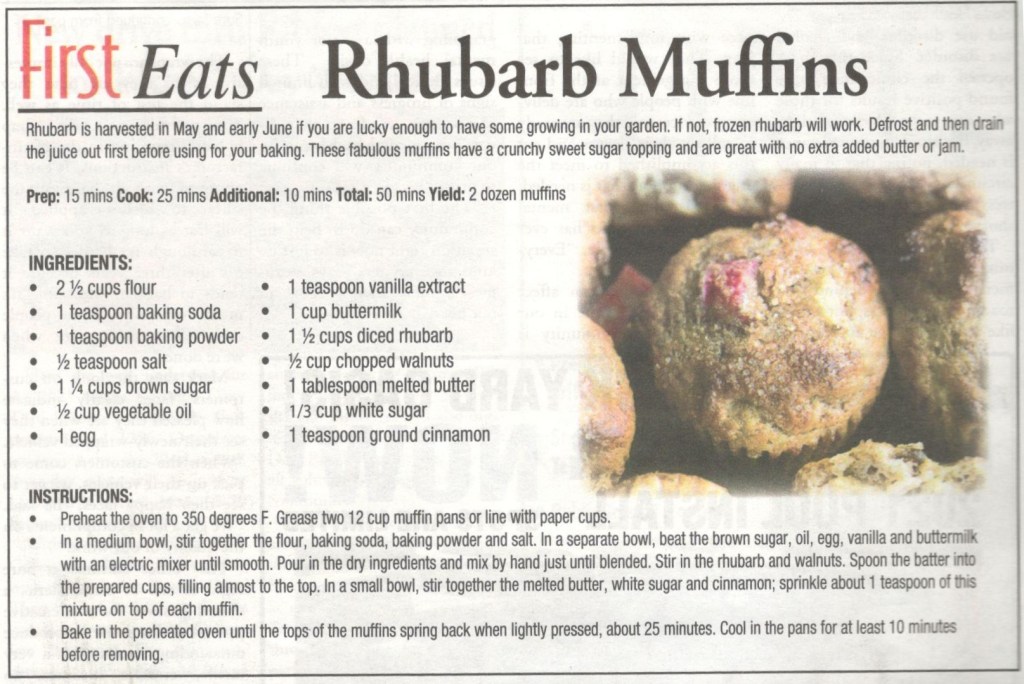
Enough of the memories, back to the rhubarb, as you must be hungry by now. Today’s recipe is for Rhubarb-Walnut muffins, which I adapted from a local magazine. When I say adapted, well you know I sometimes don’t follow a recipe exactly, with mixed results…
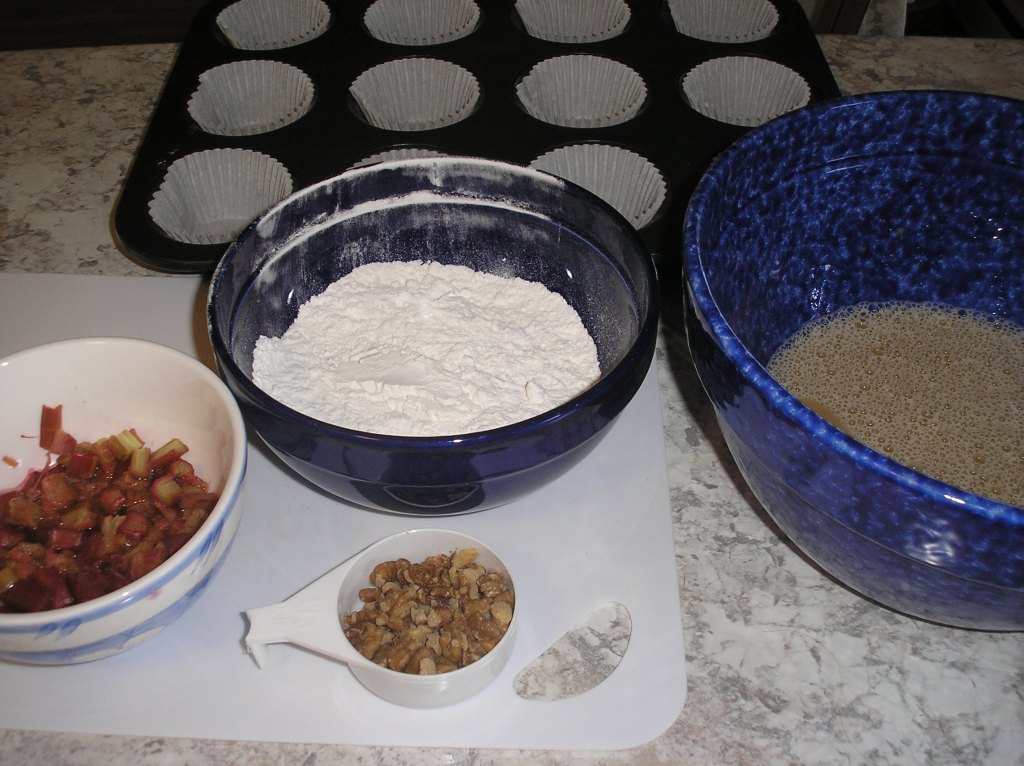
The Ingredients:
I didn’t have any buttermilk and while I know you can sour milk by adding lemon or vinegar I didn’t have any baking soda either, so I just used plain milk and my premixed flour with the baking powder already in it. I halved the recipe, as what do I need with 2 dozen muffins when we’re in month five of lockdown. I also microwaved the diced rhubarb to soften it as I didn’t think it would cook in the 25 minute baking time.
Beat the brown sugar, oil (I used butter), vanilla, egg and milk with an electric mixer until smooth. Add the dry ingredients and mix by hand until just blended. Add the rhubarb and walnut pieces.
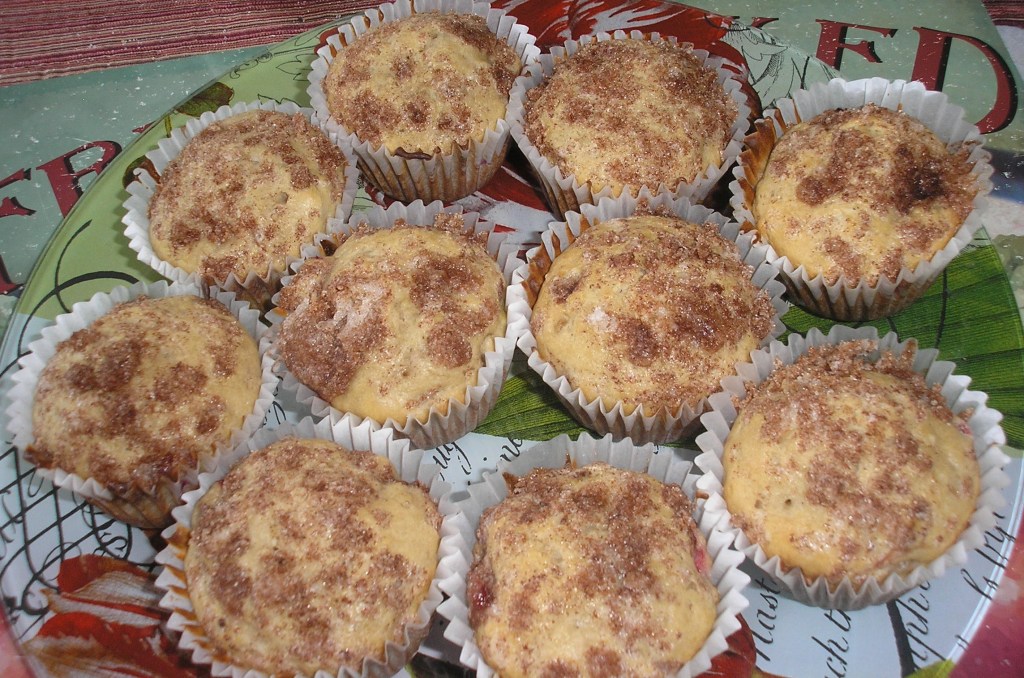
Here’s where things got interesting. The batter seemed too runny so I added some more flour, and not quite sweet enough, so a bit more sugar. Just a few tablespoons, nothing measured, but I still only got ten muffins not twelve. Spoon into muffin tin.
Sprinkle the melted butter/sugar/cinnamon mixture on top.
Bake for 25 minutes at 350 degrees.
They certainly looked pretty and turned out okay, but not great. But then I compare everything to my Rhubarb Lunar Coffee Cake, which is moist (from a whole cup of sour cream) and has a nice contrast between the sweet topping and the tart rhubarb. I found this topping skimpy and it had too much cinnamon plus I missed the brown sugar. I liked the chopped walnuts, as I’ve never added those to muffins before. The rhubarb sort of disappeared, not sure if I nuked it too long before hand and it disintegrated, or there just wasn’t enough of it. Next time I would add more rhubarb, and maybe some strawberries. They were better with some strawberry jam. I tend to be fussy with my food, but I gave some to my neighbors and my grass-cutter and there were no complaints.
Nice with a cup of tea on the deck during a gardening break.
The rhubarb patch is experiencing a third wave so after I have my cholesterol re-checked, (it was a spur of the moment decision so I didn’t fast, but we have been eating very well over the past year), I may make the Rhubarb coffee cake again. Muffins are portable, but that cake was great!
(949 words, about 700 if you eliminate the stuff about the dogs, kind of makes up for last weeks 3000 essay on LLM…..)
I’ve been neglecting my baking. Not in real life – that would never happen – but here on the blog. So this month’s recipe is for date-nut loaf, a quick and easy treat, perfect for morning coffee outside on the deck while listening to the birdsong and admiring the eighty daffodil and tulip bulbs I planted last fall. I know it sounds like a lot but they barely made a dent in my big back yard so next year I need to double it.
These daffodils are forecasting sunny days ahead… April showers bring May flowers….
And if company is allowed in your neck of the woods, they might enjoy it too. We’re still in lock-down and I don’t have my furniture outside yet, so the only company I’ve seen lately is the nest of baby bunnies living under the deck. (No photo, as they’re camera shy and quick like rabbits.)
This is an old recipe from the my mother’s farmhouse cooking bible.
The Purity Cookbook
She used to make this when I was a kid and it was always a favorite after-school treat after a long and hungry bus ride home. Sometimes she would add raisins too, but I don’t, because some people think eating a raisin will kill them. (If you’re reading, you know who you are) It’s doesn’t contain a ton of sugar as it’s sweet enough with the dates, and add in the nuts, and it’s a fairly healthy quick bread. I started making this over a decade ago, when the cookbook was re-issued, and make it several times over the course of the winter. It’s one of those never-fail recipes, although I like to use a glass pan to make sure I don’t burn it and I only leave it in 50 minutes.
The Recipe:
The Ingredients:
The Directions:
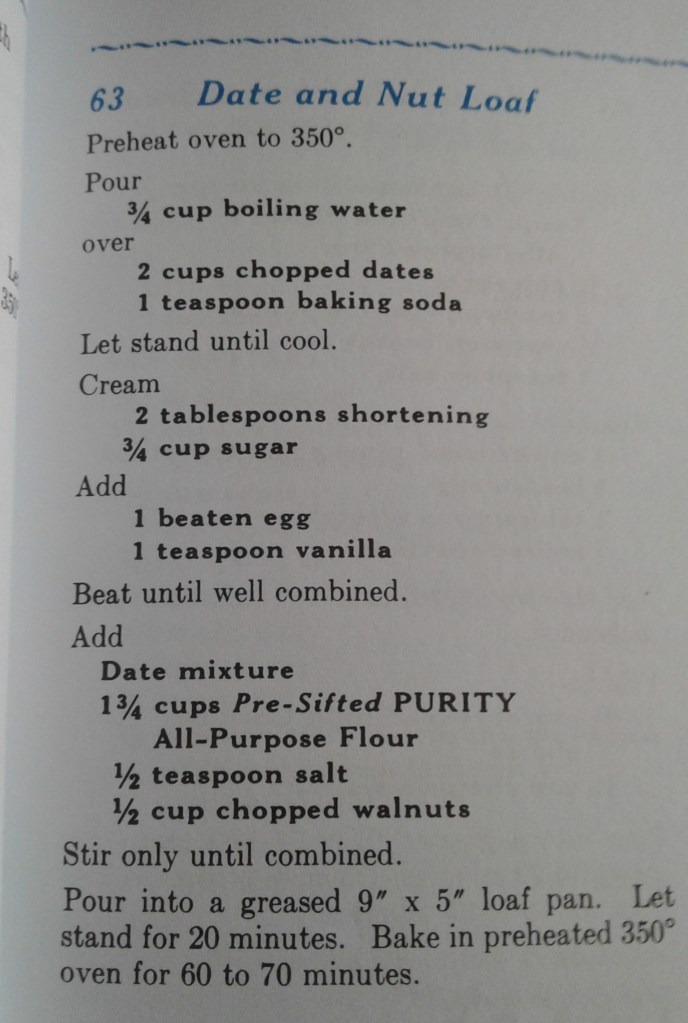
Pour 3/4 cup of boiling water over the dates and one teaspoon of baking soda, to soften them. I buy the chopped dates. Let cool.
Mix together 3/4 cup of white sugar (not brown), 1 beaten egg, 1 teaspoon of vanilla and 2 tablespoons of softened butter. I use butter instead of shortening as I grew up on a dairy farm, but it’s an old recipe from the days when people used Crisco etc.
Add the date mixture, 1/2 cup of chopped walnuts or walnut pieces, 1 and 3/4 cups of flour and 1/2 tsp of salt and stir until combined. I use the premixed flour with the salt and baking powder already in it, and omit the baking soda from step one.
The mixture will be fairly thick. Pour into a greased 9X5 inch pan and bake in preheated oven at 350. Check after 50 minutes. The recipe says 60-70 minutes but in my oven that would be burnt.
The End Result:
It’s nice slathered with butter, but tasty without too.
Enjoy outside while communing with nature.
And smelling the cherry blossoms.
And if company drops by they might be persuaded to pose for a picture.
Somebunny was caught tip toeing through the tulips…
There’s nothing like warm freshly-baked bread with a bowl of soup, especially this time of year when the March winds start to howl. No-knead Dutch oven bread is this year’s sourdough. I missed the sourdough craze last spring as the grocery stores were out of yeast and flour. (Can you believe we’re now approaching the one year anniversary of this pandemic?) I’ve never worked with yeast before as the only kind of bread I’ve made, the Irish Soda Bread from last year’s St. Patrick’s Day blog, relied on a chemical reaction between buttermilk and baking soda, but the recipes seemed easy enough, and as I already own a heavy cast iron Dutch oven, I thought I’d give it a try.
I did have some hesitation though, as I remembered those early bread machines which were so popular as Christmas presents a few decades ago. My mother had one, and while the kitchen smelled wonderful while it was baking, the bread itself was yeasty tasting. There were prepackaged bread mixes you could buy for them at the grocery store, and the loaves were small odd shaped things with minimal crust, but the bread maker was donated to the thrift shop years ago, so my recollection is hazy at best.
My mother never made bread. We were Wonder Bread kids growing up, but every Wednesday when she got groceries in town, she would go to the International Bakery and buy a big loaf of Italian bread. I would arrive home on the school bus famished, and cut a thick slab of it, which lavishly spread with butter, would tide me over until suppertime. It was a big square loaf with a nice crust, and the inside was so soft and doughy it would melt in your mouth. I’ve never tasted anything like it since, but the bakery went out of business decades ago. Although I have found a place which sells an excellent pumpernickel bread.
Pumpernickel bread.
Dutch oven bread is no-knead bread, baked in an extremely hot cast iron pot with the lid on, thus mimicking the traditional bread ovens that bakeries use to make artisan loaves. The steam generated by the Dutch oven produces a loaf with a nice crusty outside and a soft full-of-air-holes texture inside.
For something with only three simple ingredients there’s certainly a plethora of recipes out there. After wasting a considerable amount of time on the internet – Facebook (2 videos), googling (5 cooking websites) and youtube (2 videos), plus one video from a retirement home newsletter of someone’s dad baking bread – I was dazed and couldn’t remember which recipe was which. Anything requiring two risings or rising for 8 hours or more I eliminated – I’m not a morning person and didn’t want to be baking bread at midnight.
The amounts of ingredients varied too. The flour ranged from 3 cups to 5 and a half, (I have a smaller size Dutch oven), the yeast from half a teaspoon to two teaspoons or a whole packet, and then there was the type of yeast, traditional active dry yeast or instant, the salt from one and a half teaspoons of sea salt to one teaspoon of regular salt. Then there were all the extra ingredients and flavorings, sugar, olive oil, rosemary, dusting with cornmeal etc. It was mind-boggling. Finally I just sort of improvised, using a combination of the dad’s video plus an on-line recipe which allowed for instant yeast which is what I had bought.
The Ingredients:
Instant Quick-Rise yeast can be added to dry ingredients and only requires one rise.
The Recipe:
3 cups of flour (I used all purpose white flour, the Robin Hood brand as that’s what I had, and that’s what the dad used in his video, but bread flour is okay too).
1/2 teaspoon of yeast (the dad’s video said 1/2 tsp of any kind, but I used the instant quick-rise brand. It was not too yeasty so the next time I would increase it to 3/4 teaspoon or even a full teaspoon)
1 teaspoon of regular salt (I didn’t have any sea salt)
1 1/2 cups of warm water (105 -110 degrees for regular yeast – not hot boiling water as it can destroy the yeast. The quick rising yeast I used said on the package to use water a bit warmer 120-130. Here’s where things got tricky – I just let it run from the tap and guessed, as I don’t have a food thermometer, just a meat one)
The Directions: Making the Dough:
Place the flour, salt and yeast in a bowl large enough for the dough to double in size. Then pour the warm water on top or make a well,. Use a spatula, wooden spoon or your hands to mix together. (I used my hands in disposable pandemic gloves!) The dough should be somewhat wet and sticky, but add a bit more flour if it’s too sticky to handle. I had to add a bit more water as mine was too dry.
Icky-Sticky – and maybe a new use for those pandemic gloves?
Leave the bowl on the counter and let it rest with a towel or plastic wrap over it for 8-24 hours. If you’re short on time, you can bake as soon as 2 hours. The longer it sits, the better. You can also refrigerate it for up to 7 days. (online recipe directions)
I used both plastic wrap and a towel over it.
I had intended to only leave it for 2 hours, but got side-tracked with cleaning a years worth of papers off the desk in the den which is a general repository for junk….so it was actually 3 hours before I checked. It had risen nicely, although I’m not sure it had quite doubled in size, and there were bubbles on the top but not many. (Perhaps a bit more yeast next time?)
Bubble trouble?
Preheat the oven to 450 F starting about half an hour before the rising is complete. (As I got distracted with the paper sorting and forgot to preheat the oven, supper was left over stew with day old biscuits instead of fresh bread!) Place your 4-6 quart Dutch oven WITH THE LID ON IT, into the oven for at least 30 minutes to get hot. You want to add your Dutch oven BEFORE preheating so it preheats with the oven, to prevent it from cracking. And always remember the oven mitts – as the oven will be hot, hot hot!
Shaping the Dough:
The dough on a piece of floured parchment paper
Flour a piece of parchment paper and generously flour your hands. Turn the dough onto the paper. It will be sticky. Do not punch down, knead or roll it out. Gently and quickly work the dough into a French boule (round ball). Lightly dust the top with flour and then use a bread knife to add 1 – 4 shallow lines across the top. Scoring the bread with a cross lets the fairies out and stops them from cursing your bread. (Just seeing how many of you recall the fairy tale from last year’s Irish Soda Bread!) Actually, scoring helps it to expand while heating, and makes it look very artisan-like. My French boule kind of flopped over while I was waiting for the oven to heat, so next time I would work it into shape on a floured board and then transfer it to the parchment paper. I found it hard to work with it on the parchment paper as the paper moved around too much.
Bake:
Not sure why my oven coil is glowing purple?
Picking up the corners of the parchment paper, carefully place it in inside the Dutch oven. Careful it will be hot – oven mitts! Cover with the lid and set the timer for 35 minutes, still at the 450 F.
As I had cut too large a piece of parchment, some of it was outside the lid, so after awhile I started to smell the paper singeing. Plus the whole kitchen smelled of yeast, which I discovered has quite a chemical smell. What I did not smell was the lovely scent of bread baking, because the lid was on!
Looking good after 35 minutes.
After 35 minutes remove the lid and bake an additional 10-15 minutes or until golden brown. When you remove it and knock on the bottom of the bread it should sound hollow.
Total cooking time 45 minutes – 35 with lid on, 10 with lid off.
I set the timer for ten minutes with the lid off, but I should have checked it after five, as it was a bit too brown looking, but oh my, the crust was divine, crackly and crunchy and delicious! The inside was not too yeasty tasting, which had been my fear, but soft and doughy. There weren’t many air holes, so more yeast or rising time next time.
Artisan bread!
Allow to cool on a cooling rack and then slice and serve. Store in a paper bag so it doesn’t soften. I did, but the next day it was too hard, so I think a Zip-lock bag would have been better, or a bit less cooking time next time.
Supper was long over, but someone stole a chunk and had it with some old cheddar and pretended they bought it at a French boulangerie.
So ends my first foray into bread baking. Overall I was satisfied with the end result, but would tweak the recipe to add more yeast and more rising time, buy a food thermometer as I suspect my water wasn’t warm enough, and perhaps experiment with half whole wheat flour, next time. I would also prep the ingredients in the morning, (I started at 2 pm), and time it better, or maybe even leave it in the fridge overnight, although my fridge is very cold. I did find it was best eaten the same day, warm with butter. I hope this post inspires someone else to give it a try. (Sorry, Dave of Life in a Word, you’ll have to wait until after Easter!)
When I was working I took a sandwich for lunch almost every day, but I don’t buy much bread anymore. Bread has gotten expensive. It costs me $3.50 the other day to buy a loaf of the ordinary white my mother likes, occasionally it’s on sale for $2. My whole grain brand is seldom below $3. An artisan load can easily run $4 or $5. The baking dad in the video said he was able to make 25 loaves of bread from the big 25 lb bag of flour he buys, making it $1 a loaf, something to consider if you’re on a budget or have a large family.
I worked with a new immigrant from one of the Eastern European Bloc countries, and one day in the staff room, she let me sample her homemade bread. It was a dark almost pumpernickel color with a nice texture, just bursting with flavor. She made all her own bread every week for her family, as back home bread was so expensive, that no one could afford to buy it at a store. A box of cereal cost $20, due to runaway inflation, so people cooked from scratch. I asked her for the recipe, which she scribbled on a piece of paper – three simple ingredients…infinite variations. (She also added a few teaspoons of butter and sugar and did two rises). If I can bake bread, anyone can….but I don’t think I’ll be opening a boulangerie anytime soon. I suspect the art of baking the perfect loaf of bread might require a bit more practice. If there’s potato soup for St. Patrick’s Day, I’m willing to give it another try.
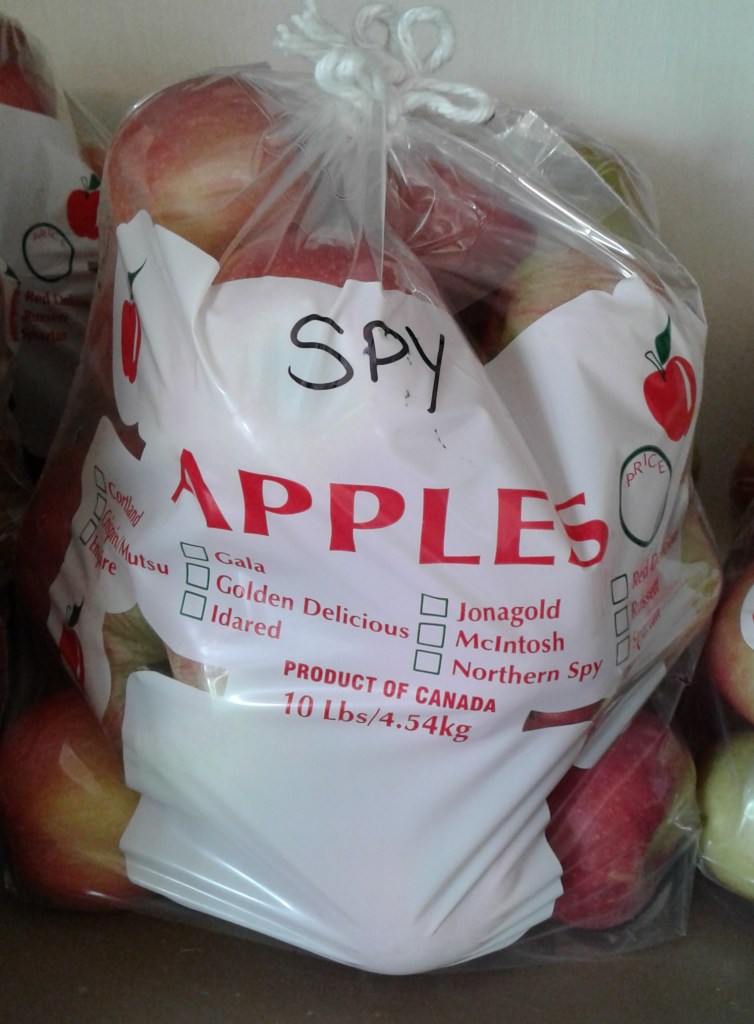
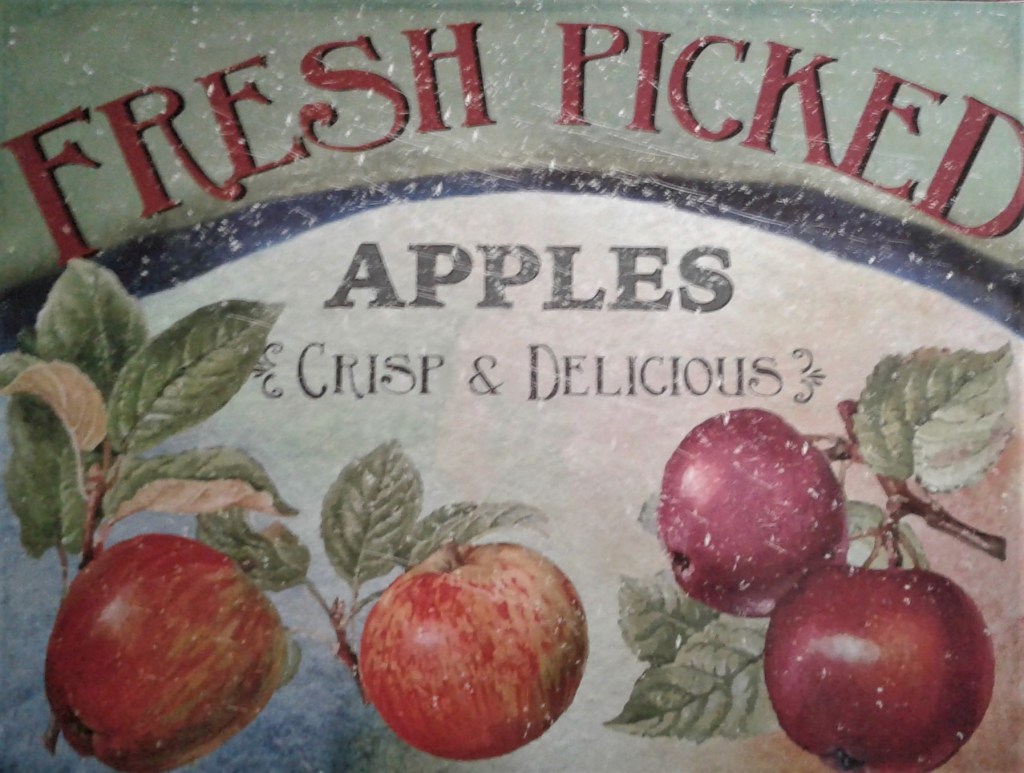
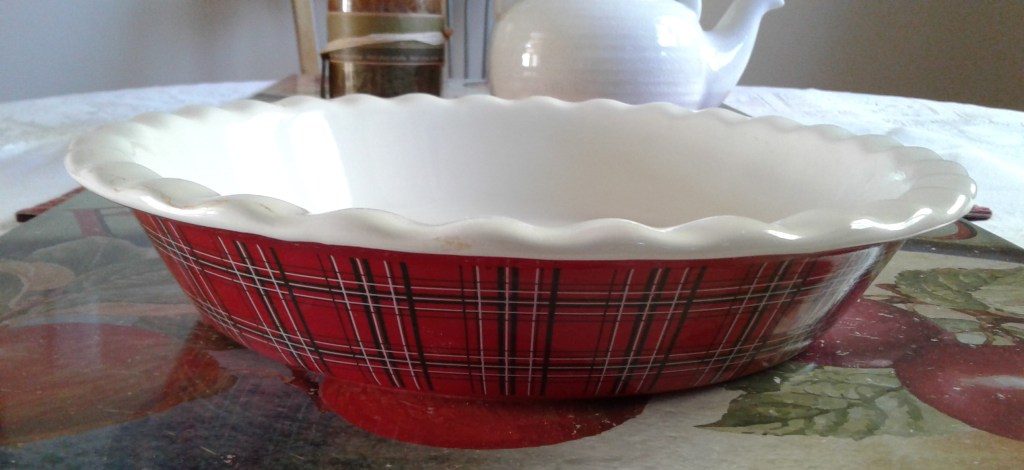
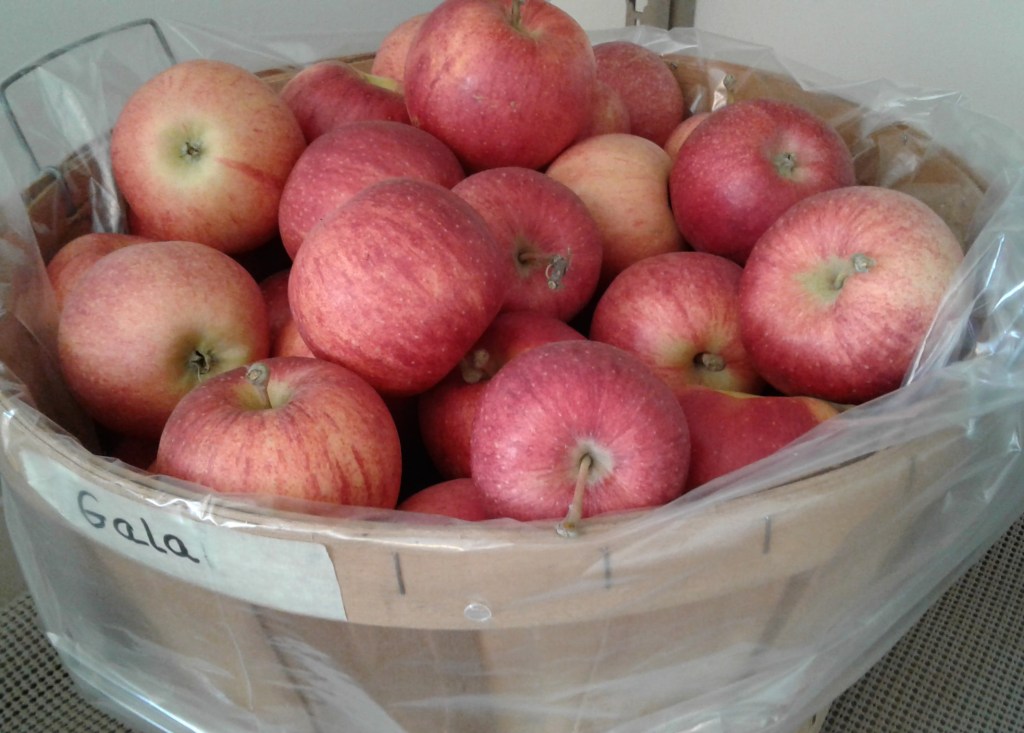
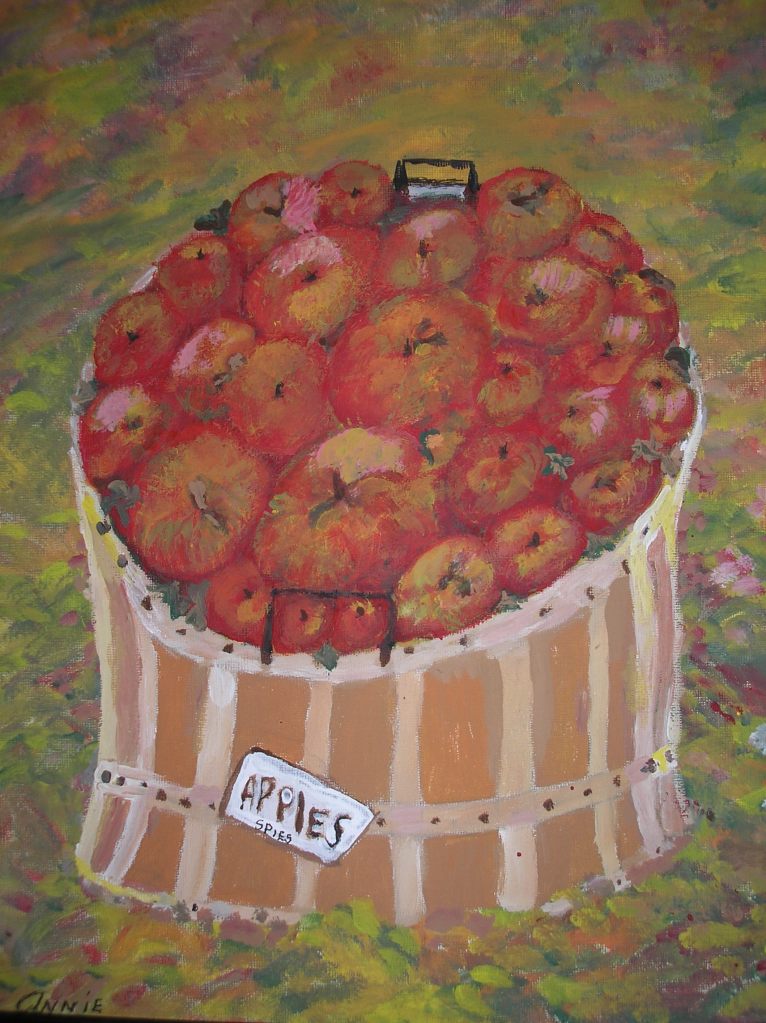
The Source – a trip to the apple orchard to buy six different kinds…because everyone has their favorite….There’s nothing like a ripe juicy apple picked right off the tree…Northern spies are the best for pies…Perfect for peeling, my kitchen place mats wipe clean…Time to bring out the plaid pie plate… The end result, warm out of the oven….The last piece, minus a bite…..Even better with ice cream…..The inspiration behind the painting…Bushel of Apples Jane Austen was right – two hundred years later!
Butter tarts are a uniquely Canadian dessert. Like other iconic Canadian foods such as maple syrup and poutine, they originated in 17th Century Quebec, where the wives of early French settlers made use of the available ingredients of maple syrup and dried fruit to whip up a treat to make life in the wilderness a little more bearable. Their experimentation led to the evolution of the modern butter tart, although most recipes today do not call for maple syrup.
As Canadian as maple syrup….
This decadently sweet tart consists of a filling of butter, sugar, syrup and egg, baked until the filling is semi-solid, ie nice and gooey. Raisins or nuts are added, with the raisin debate being a whole other topic, along with the degree of consistency, runny or firm. Butter tarts tend differ from other sugar-based pies such as pecan pie in that they have a runnier filling – no cornstarch or flour required.
Other than those basic ingredients, there are as many variations as there are family recipes, many dating back to the pioneer days. Butter tarts were all the rage in the early 1900’s, appearing in many cookbooks and have since become an ingrained part of Canadian cuisine. There are several butter tart festivals held every year, including one in Midland which sells over 50,000 tarts, with the contest portion attracting bakers from all over to vie for the Best Butter Tart title. Like a rib-fest for dessert lovers you can walk around and sample to your heart’s content.
My inspiration for this post came from a trip to the bakery which used to sell my favorite version (past tense intended). Their pastry is good, but I had noticed the filling kept getting skimpier and skimpier, and the last batch, which was pre-ordered and boxed before being paid for, were basically just pastry shells with a thin scraping of filling , and at $10 for 6 tarts they were certainly no bargain. My second favorite source, a local coffee shop, sells tarts with plenty of filling but their pastry is thick and hard as a rock. Maybe those two could marry and produce the ideal butter tart progeny, or….maybe I could make my own, for a lot less money too!
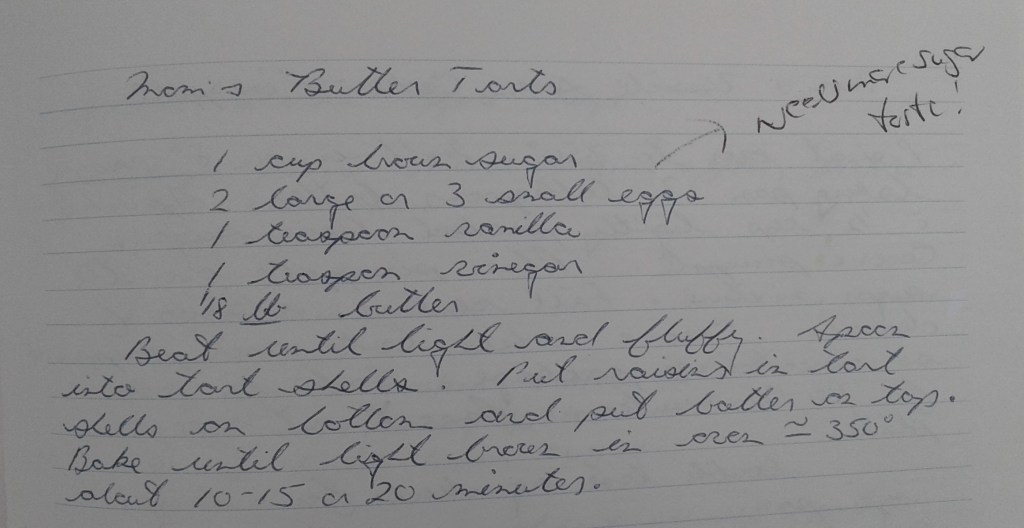
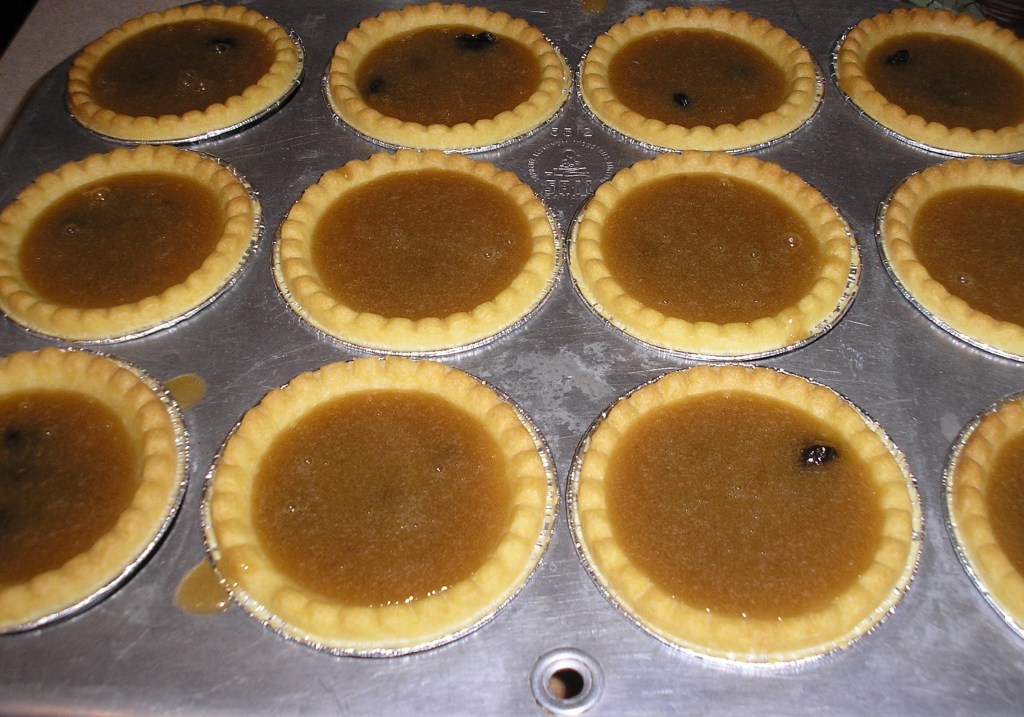
My mother made butter tarts when I was growing up but they were usually reserved for the fall of the year when she was deep into pie-baking and made use of the left-over pastry. A batch or two often graced our Thanksgiving table along with the apple and pumpkin pies. So I got out her old recipe, which was vague in the way that my mothers recipes often are, (she was never one of those cooks who measured) and we proceeded to experiment.
My mothers recipe…..more or less…..
They turned out as we remembered them, not overly sweet, with the multiple eggs making for a firmer consistency, but I thought they needed more sugar. I didn’t have my glasses on, but if I had read my own notation, it very clearly stated that! As for the bake 10-15-20 minutes, her oven is temperamental so I left them in longer in an attempt to get the crust brown and the filling got too firm….but the end result was a perfectly good butter tart.
Mom’s old 1950’s tart pan.
The recipe made twenty tarts, and try pawning off tarts during a pandemic when we’re now back in our smaller social bubbles and they are encouraging people not to congregate for Thanksgiving (which is next weekend here in Canada).
Anyone care for a butter tart?
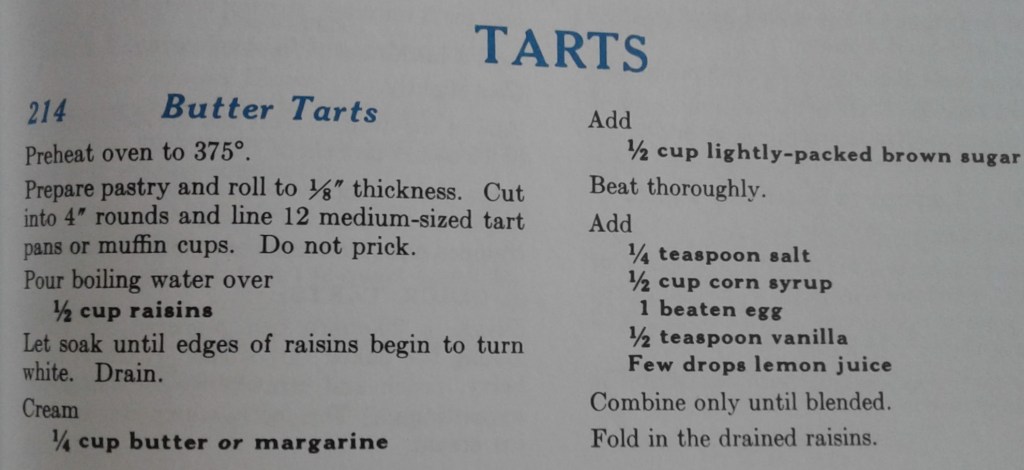
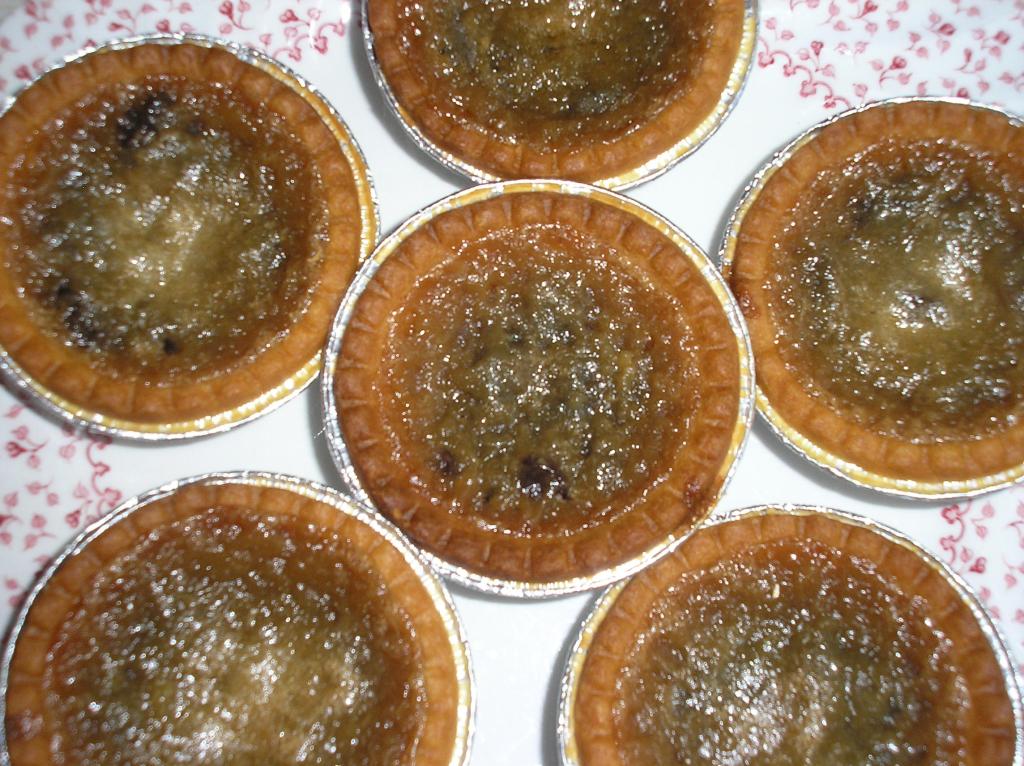
Moving on in my search for the Great Canadian Butter Tart, I wasted much time googling and then referenced back to my old farmhouse cooking bible, the Purity Cookbook, first published 1911, and there was the recipe for the best butter tarts ever!
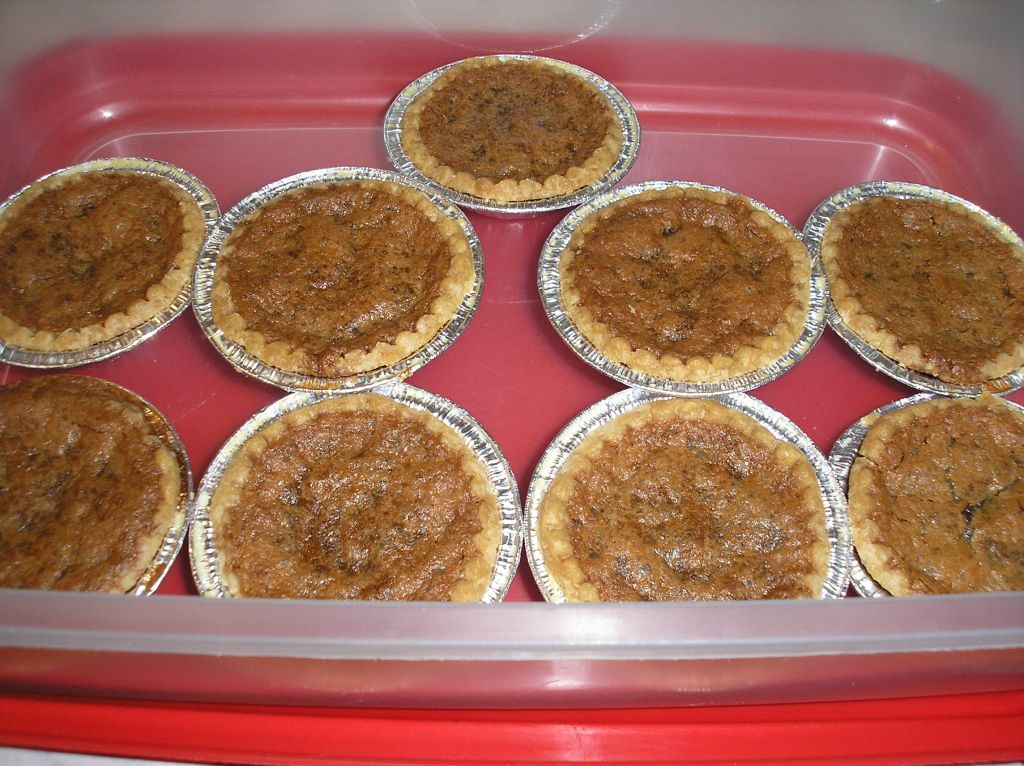
Unlike the previous recipe this one called for corn syrup. I used the dark corn syrup for color. It had been so long since I bought corn syrup I didn’t even know it also came in a colorless format. I omitted the salt and lemon juice as I like a sweeter tart.
I added a bit more sugar to taste, and a bit more butter as there was some left in the bottom of the dish. (I am my mother’s daughter after all.) I pre-baked the store pastry shells for 5-10min, as I was using her oven and then added the raisins. (no need to presoak the raisins).
Those of you who might die if you ate a raisin (which is but a wrinkled grape) can use nuts or nothing if you prefer. The pioneer women used currants.
I baked them for exactly twenty minutes and they came out with the perfect degree of runniness. The pastry was a bit browner than I would have liked, but flaky and good for a no-name store brand. If using my oven, I may not have pre-baked the shells and would just have left them in for 20-25 minutes. Live and learn is the lesson for an inexperienced cook like me, with a perfectionist streak.
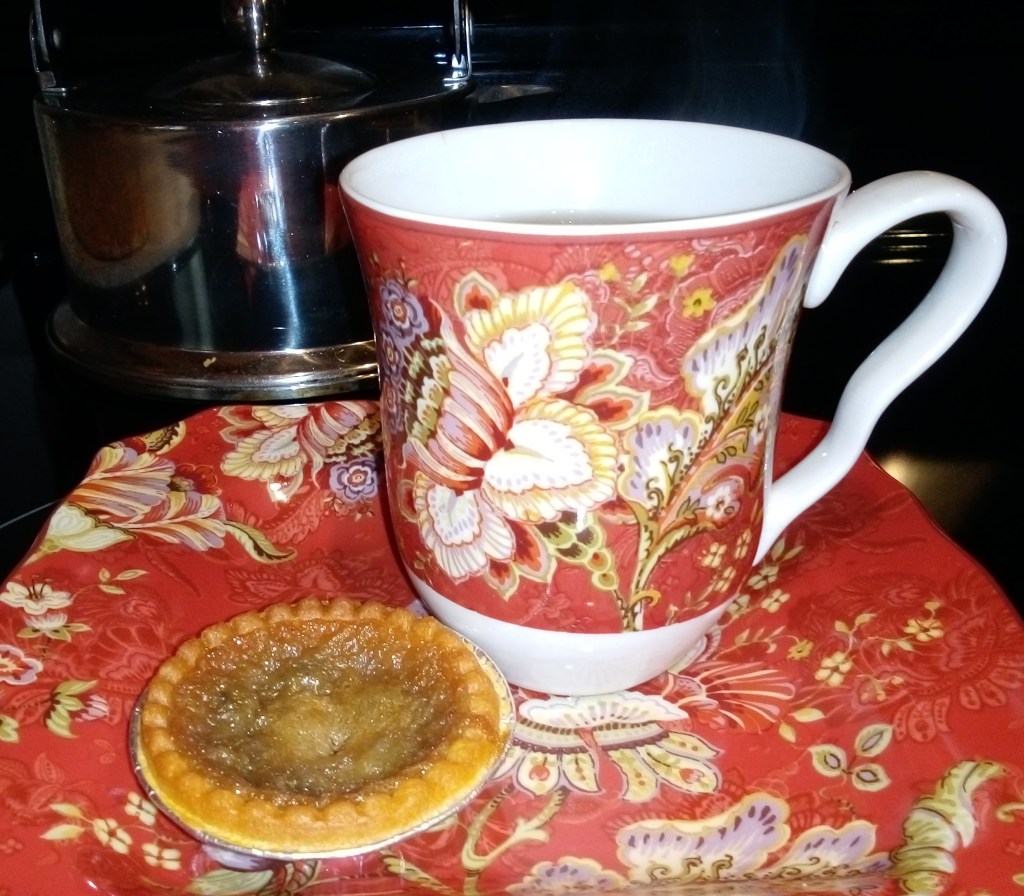
All in all, both my mother and I gave them a ten – and thought they were the best butter tarts we’d ever eaten – simply perfect in taste and texture. They were even good after a few days, although I stored them in the fridge and heated them for ten seconds in the microwave. The recipe made twelve, enough for a sweet treat with a mug of hot tea every night while watching the evening news. Most days you need that to carry on.
Tea and tarts….
Keep calm and Butter Tart On – maybe a slogan for next years festival?
The expression “life is a bowl of cherries” translates to life is wonderful or things are going very well. For the sake of simplicity, let’s change this slightly to “life is a bowl of peaches” so I have something to write about this week and can experience first hand how truly wonderful this new block editor is supposed to be.
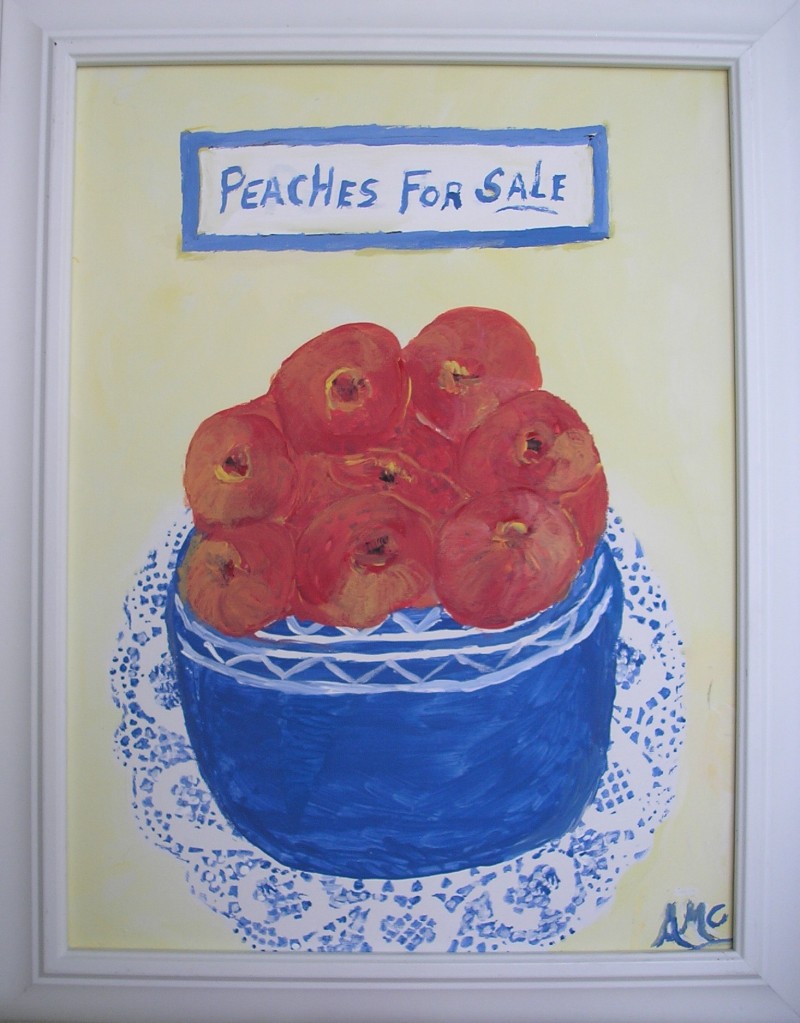
Peaches in a Blue Bowl
This months recipe is a peach galette. Galette (from the Norman word gale, meaning “flat cake”) is a term used in French cuisine to designate various types of flat round or free-form crusty cakes, with a combination of sweet or savory fillings. A fruit galette is a French tart made with one flat piece of pastry that is wrapped around a fruit filling. Being free-form it’s easier than pie and for those of us not adept at making rich flaky pastry, a store bought pie shell is perfectly acceptable. The aim is to make it look rustic, like something you would serve under the shade of a tree in Provence.
Photo from Victoria Magazine July/Aug 2018
As my favorite vendor is no longer at the Farmer’s Market, I made the trip to their farm to pick up a box of peaches for making jam. I’d ordered ahead and specified over-ripe seconds as I had already sanitized the jars in the dishwasher that morning. As in years past, the seconds were a bargain at $10 for a big box of peaches.
Canning Peaches
Except….I’d already paid for them and the clerk had put them in the trunk of the car before I realized they were small, cold and nowhere near being ripe. Where were their usual big juicy peaches? I might have gone back in to inquire but the storefront was crowded and there was absolutely no attempt at social distancing. (How much effort would it take to mark the floor with tape and only let so many people inside, especially with the higher COVID numbers in some of these agri-food areas?) So I grumbled and left and five days later they were starting to spoil and get soft and spotty on the outside while the insides were still not quite ripe, but cut up they were, and two batches of freezer jam produced, with extra sugar to make up for the lack of juicy peachy flavor. It hasn’t exactly been a stellar year for most fruit here, with everything behind due to the cold late spring and snow in May.
After making the jam I still had 24 peaches left so a small peach crisp was created and then some peach trifle, both with good results and more sugar (but no pictures as I forgot before they were consumed), and then the “piece de resistance”, the famous French galette, and there were still a few left over for eating. It was the box that kept on giving…..even if it wasn’t a vintage year.
Now the head chef (moi) was not above borrowing a recipe from another source, said source being the Lifestyle section of the local paper, so here’s the recipe.
The filling called for 5 peaches cut in half, pit removed and sliced, 1/4 cup brown sugar, 2 tbsp flour, and 1/2 tsp cinnamon and ground ginger. I doubled the sugar but it still could have used more. I left out the ginger as it had expired in the last decade. I made this at my mother’s and her spice rack is suspect and her oven temperamental, but she enjoyed peeling the peaches as it reminded her of life on the farm and canning every summer.
The Tenderflake deep dish pie crust I bought, did not look any too deep to me, as by the time the fruit was piled in the middle,
there was not much pastry left for crimping the border.
The pastry is folded over the fruit, aiming as I mentioned, for the rustic, not too perfect look.
The finished product was not pretty, the filling having bled a bit around the edges, and gotten rather burnt in spots while trying to brown the pastry, having to be scraped off by a kitchen knife before any photo-ops ensued. Plus the lighting in her kitchen is not good at all, not flattering to anyone, least of all a French galette. It did however taste better with some French vanilla ice cream.
It was by no means a Michelin five star job, but the best I can say is I tried and the end result was certainly rustic. Maybe next time with apples? The same can be said for the block editor. It’s certainly doable – but do I want to do it? I think I’d rather stay with the classic.
(This is the first post I’ve drafted in block and I seem to be using a hybrid of block and classic, with things popping out at me and the draft itself shifting from right to left to center for no discernible reason. If it was closer to Halloween I’d swear it was haunted.)
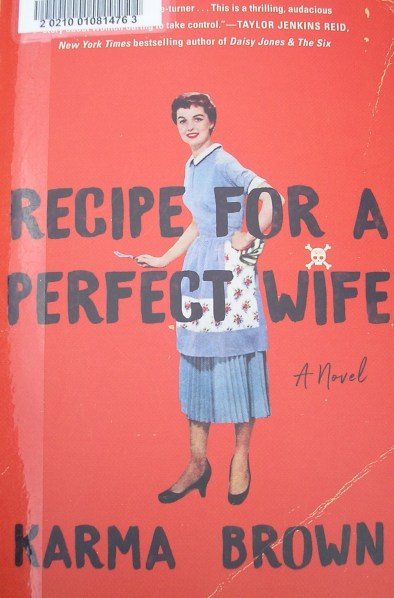
This month’s recipe was inspired by a book. Recipe for a Perfect Wife, by Karma Brown, is a quirky look at the lives of two newly married women living in the same suburban house sixty years apart – Nellie, a typical 50’s housewife, who is trying to get pregnant, and Alice, a reluctantly transplanted New York City writer, who is trying not to. Told in alternating voices, Nellie 1956 and Alice 2018, with quotes of outdated advice at the beginning of each chapter and lots of 50’s recipes, it’s an interesting look at marriage, then and now.
This book appealed to me because of it’s unique format, plus I thought it would nice to read about what life was like for my mother’s generation – my mother had 4 children under the age of 7 by 1960. (It’s exhausting just thinking about that.) The book was immensely readable, but not quite the light fluffy read I had expected. While itstarted out okay, it soon took a dark turn and ended up with a strange ending. I didn’t really like any of the characters, dishonesty seemed to be a common trait – hard to base a marriage on that, even back then when people often didn’t know each other well before becoming engaged. Of course the author was trying to make a point, and it would make an excellent choice for a book club discussion. You could even make some of the 50’s recipes like Baked Alaska. I always like it when the book club dessert matches the book club selection.
My recent Hermit Cookiesblog, sparked a discussion about family cookbooks, Betty Crocker and Fannie Farmer being old favorites, although my mother’s bible was the Purity Flour Cookbook. Growing up on a farm in the 60’s, my family meals were invariably our own home-grown vegetables and meat, and of course no meal was complete without a potato. No rice or noodle casserole dishes for us, and spaghetti was simply pasta doused with a can of Campbell’s tomato soup. My mother did not experiment with recipes like Tuna Noodle Casserole or Chicken A La King because my dad and brothers would simply not have eaten them, and I myself was a picky eater, although she did make a good meatloaf and macaroni and cheese with bread crumbs on top.
garnish with a layer of potato chips?
For many modern housewives that era saw the ushering in of convenience foods, instead of made from scratch. Although we had boxed cake and brownie mixes, my mother made enough homemade pies and tarts to feed a threshing crew and just once that glorious Sixties Desert – Baked Alaska.
Perhaps I remember this momentous event because of it’s rarity. It was not for a special occasion, but simply on a summer evening, a couple of hours after supper to ensure that no one was too full for dessert. If you go to all that trouble, you want to make sure your masterpiece is appreciated.
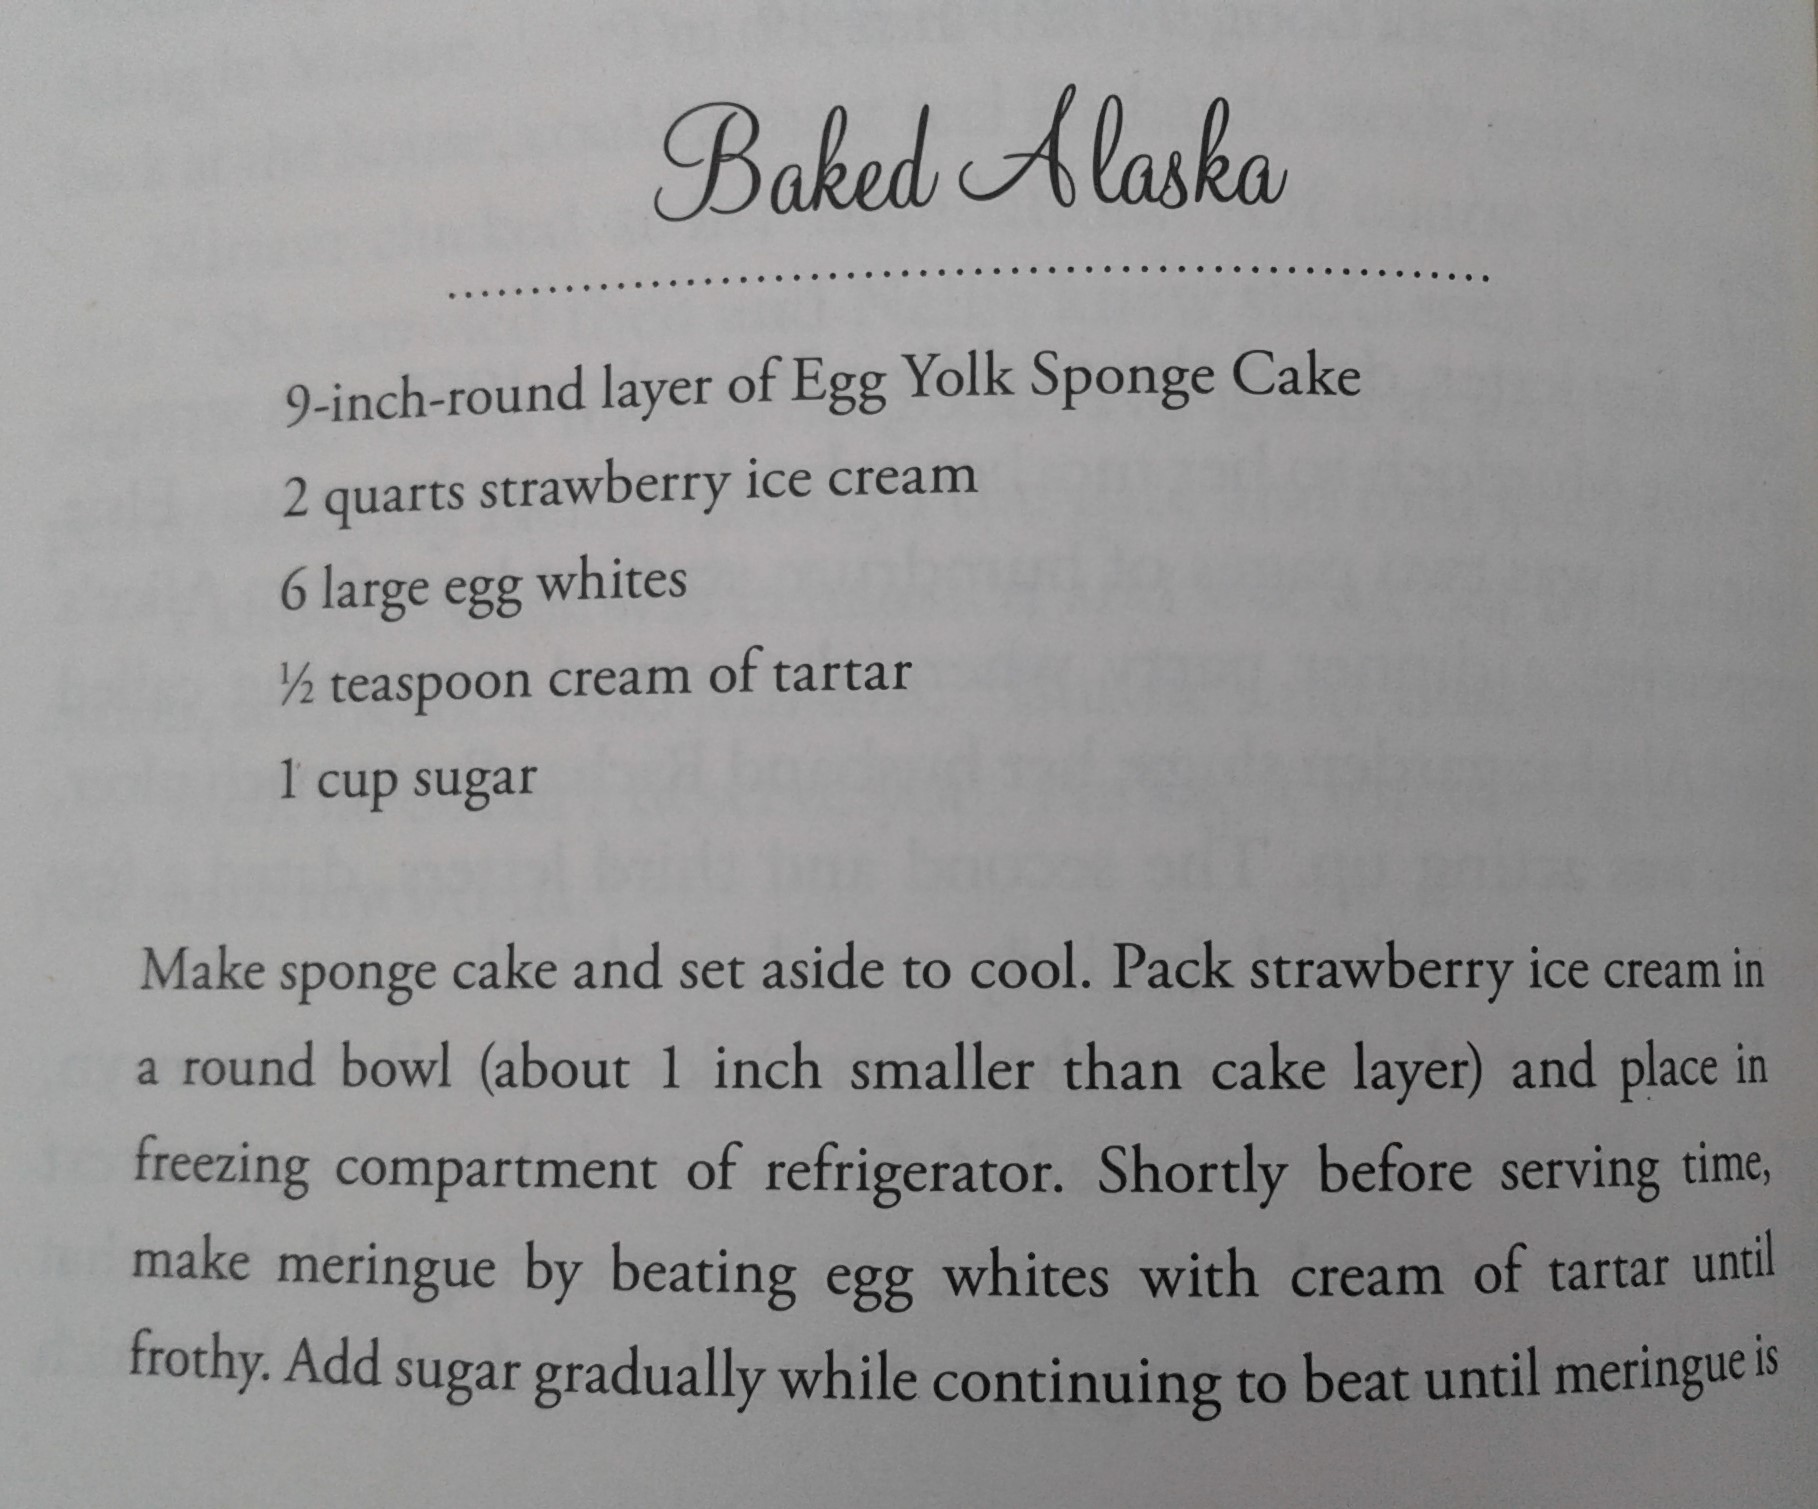
For those of you unfamiliar, Baked Alaska is basically a mold of frozen ice cream and cake, smothered with a layer of toasted meringue.
Although both my (2009 reissued) Purity cookbook recipe and the one in the book, call for white sponge cake and strawberry ice cream, my mothers version was reminiscent of this Martha Stewart creation, with chocolate cake and vanilla ice cream.
It was a marvelous sight to behold, with the meringue all puffy and peaked, and who would believe you could put ice cream in the oven! Perhaps I also remember it as chocolate cake was always my birthday choice growing up.
Baked Alaska can be complicated, if you want to mold it into a perfect dome shape, or use tea cups to make individual portions as in this Martha Steward recipe which calls for strawberry and vanilla gelato and of course, being Martha, she’s making the cake from scratch. What exactly do you do with all those separated egg yolks?
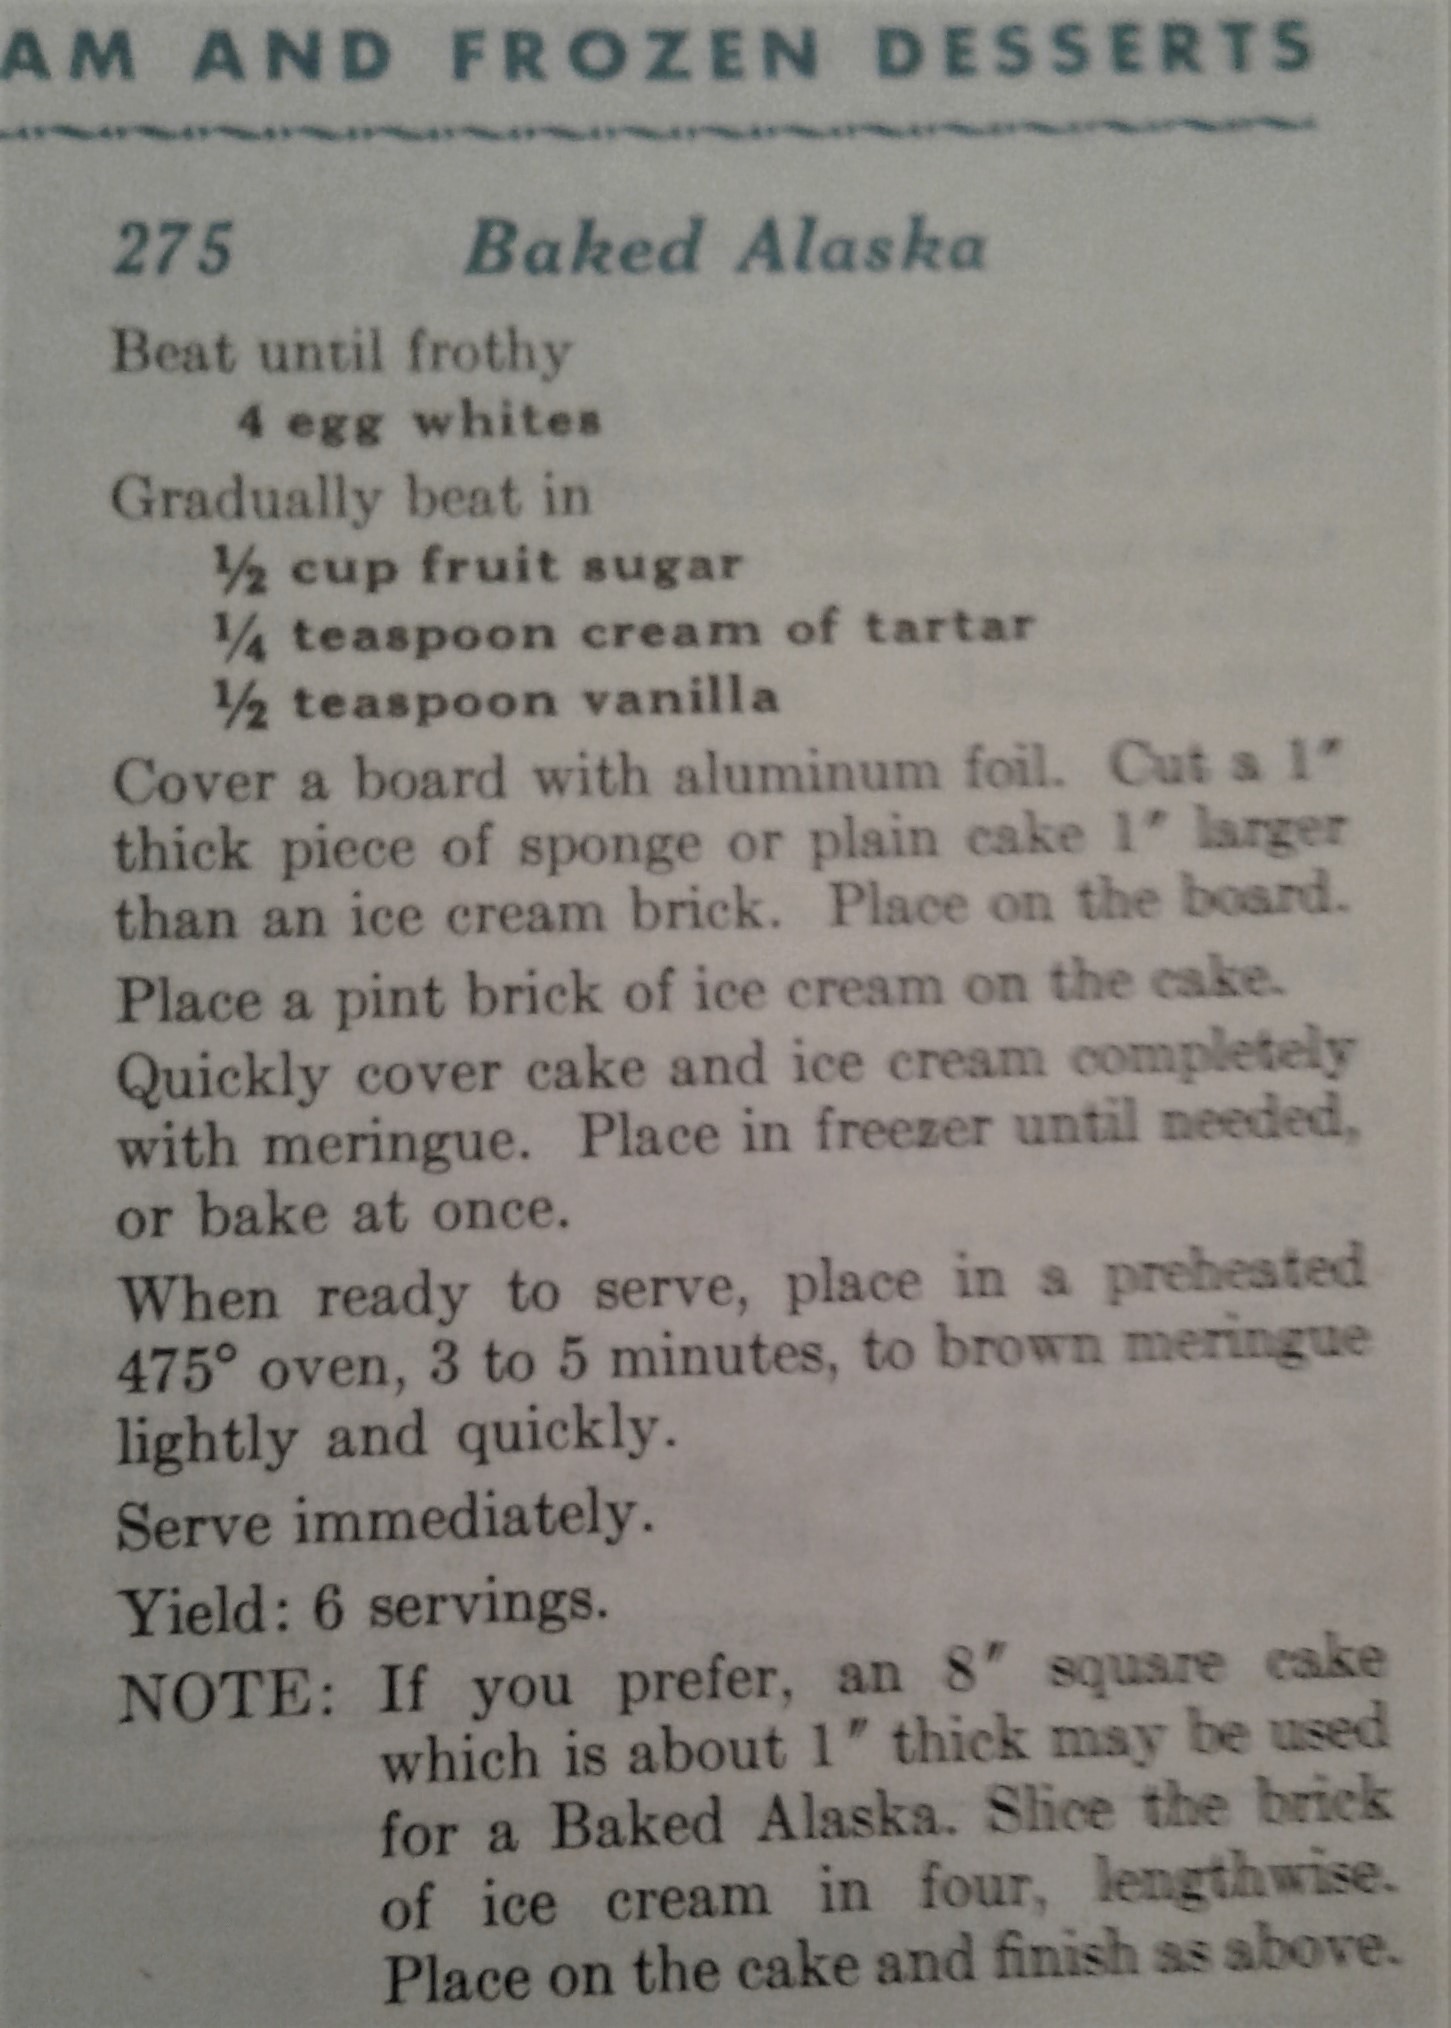
But it can also be easy if you just cut your cake and ice cream in a slab, layer it up, freeze it hard, and then smother it with meringue, as per this recipe in my mother’s 1965 version of the Purity cookbook.
Maybe not as fancy as the dome-like creation, but wouldn’t it be the same thing? I even wondered about using a carton of liquid egg whites but some sources said the heat from the pasteurization process would negatively affect the egg proteins. (Cream of tartar is included as an acidic stabilizer to keep the proteins in the egg whites from sticking together thus enabling a smoother stiffer consistency. Alternatives are lemon juice or white vinegar.)
So, I did a grocery run yesterday and bought a carton of liquid egg whites, and decided to experiment last night, and they whipped up just fine. I used lemon juice as I couldn’t find any Cream of Tartar at the store.
I forgot to buy cake, so I used two portions of Mug Cake mix from the pantry, not the best idea as the shape was not ideal and there wasn’t enough cake.
I froze two portions of vanilla ice cream in teacups (a la Martha above), and assembled them over the cake, and then added the meringue.
It wasn’t bad, but plenty sweet. I made the mistake of putting the assembled product including the meringue in the freezer for about ten minutes (as it said you could), while I cleaned up the mess, but I wouldn’t do that again, as it made the meringue hard and cold, and then it took too long to brown and by the time I took it out the ice cream was melting. Better to just put it in the oven as soon as it’s assembled. Of course I also stopped to take a few pictures, so that didn’t help.
If I was to make it again for a crowd, I’d do the slab cake, and maybe strawberry and chocolate gelato, which isn’t as sweet. Maybe when I can have people over again and hold a book club under the trees. It’s so brutally hot here this week, 35 C (95 F) and 42 (106 F) with the Humidex, that any ice cream served outside would melt lickety-split.
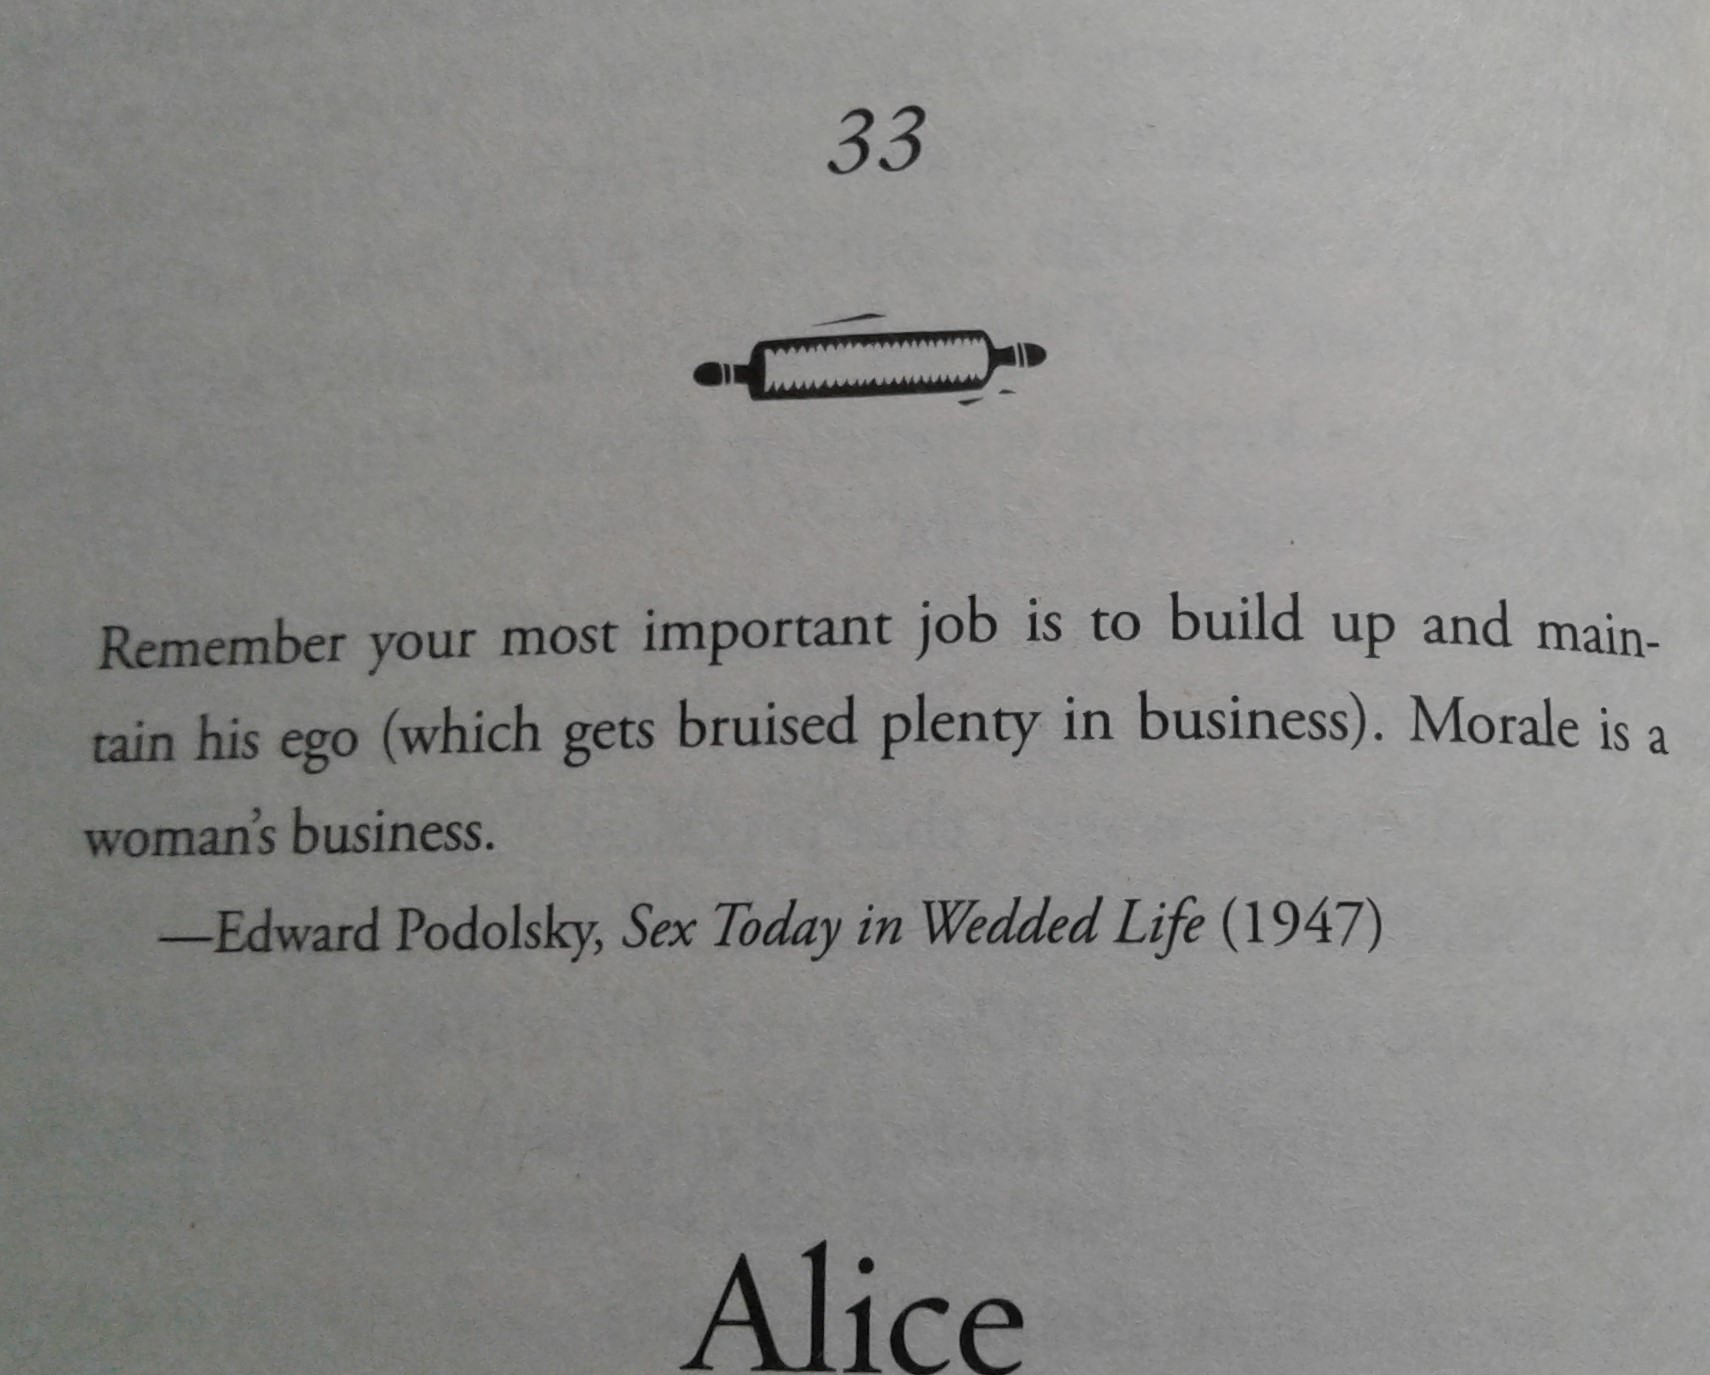
Despite my love of all things vintage, especially fashion, I don’t think I would have wanted to live in the fifties – it seemed very much a man’s world. I posed that question to my mother, and she said – it seemed okay at the time. Like many things, some decades are best viewed through a veil of nostalgia. I’ll leave you with some marriage advice quotes from the book – relics from the past….
Since many of us are still living like good little hermits these days, I thought Hermits cookies would be a good topic for this weeks blog – which might also be my last blog for awhile depending on how well it goes with the new WordPress editor next week. I didn’t like the new Block editor when I tried it last spring (see Blockheads post) and am not in the mood for a new learning curve. Wordpress might think this is a good time to switch (or begin the migration as the Happiness Engineer called it), because we are all stuck at home, but call it computer fatigue or lockdown fatigue or whatever, I need less not more screen time right now.
Back to the Hermits – Webster’s dictionary defines a hermit as: “a)one that retires from society and lives in solitude especially for religious reasons : recluse, b) a spiced cookie.
Hermits are an old-fashioned recipe dating back from to the mid-1800’s in North America, or even earlier, possibly originating in the hermitages of the middle ages. They refer to any kind of spiced cookie containing dried fruit such a raisins, currants or nuts. They may have white or brown sugar and come in either bar, square or drop cookie format. They’re made from ingredients you might already have in your pandemic pantry, which along with the addition of cinnamon, cloves and spices produces a soft cookie which keeps well. Nutritionally, their sweetness comes from raisins and dates, and nuts are a good source of omega-3’s and protein.
There are various theories about the origin of the name. Some sources say they were called hermits because they looked like a hermit’s brown sack cloth, (the ones containing molasses). Others say the spices become more distinct with age, making the cookies taste better if they have been hidden away like hermits for several days. Very likely the oldest recipe goes back to the 12th or 13th century religious hermitages, where the basic ingredients would have been in common use at bakers’ tables. The terms for those abodes— “hermite” from the Old French or “heremita,” from the medieval Latin — may have been assigned to this treat by their inhabitants. Another possibility is that the Moravians, a German Protestant religious group known for their thin spice cookies in North Carolina and Pennsylvania, were sometimes called “herrnhutter” in German or Dutch, and that might have sounded like “hermits” to an English-speaking cook. At any rate, they are spiced cookies based on raisins and nuts…..so let’s get to it!
My recipe today will be from my mother’s bible of country cooking, the Purity CookBook, first published by the Purity Flour Company in 1911. Her edition dates from 1945 and is well stained, and is in fact held together with that old Canadian standard – duct tape.
As well as main courses and desserts, it contains a large section on canning vegetables and making various jams and jellies. Nothing of course is low in fat or calories as those were not deemed important back then. When it was re-issued in 2009, I bought a copy for myself, which you can see is still in quite pristine condition.
Here’s the recipe:
This did not make 5 dozen….more like 30 cookies….
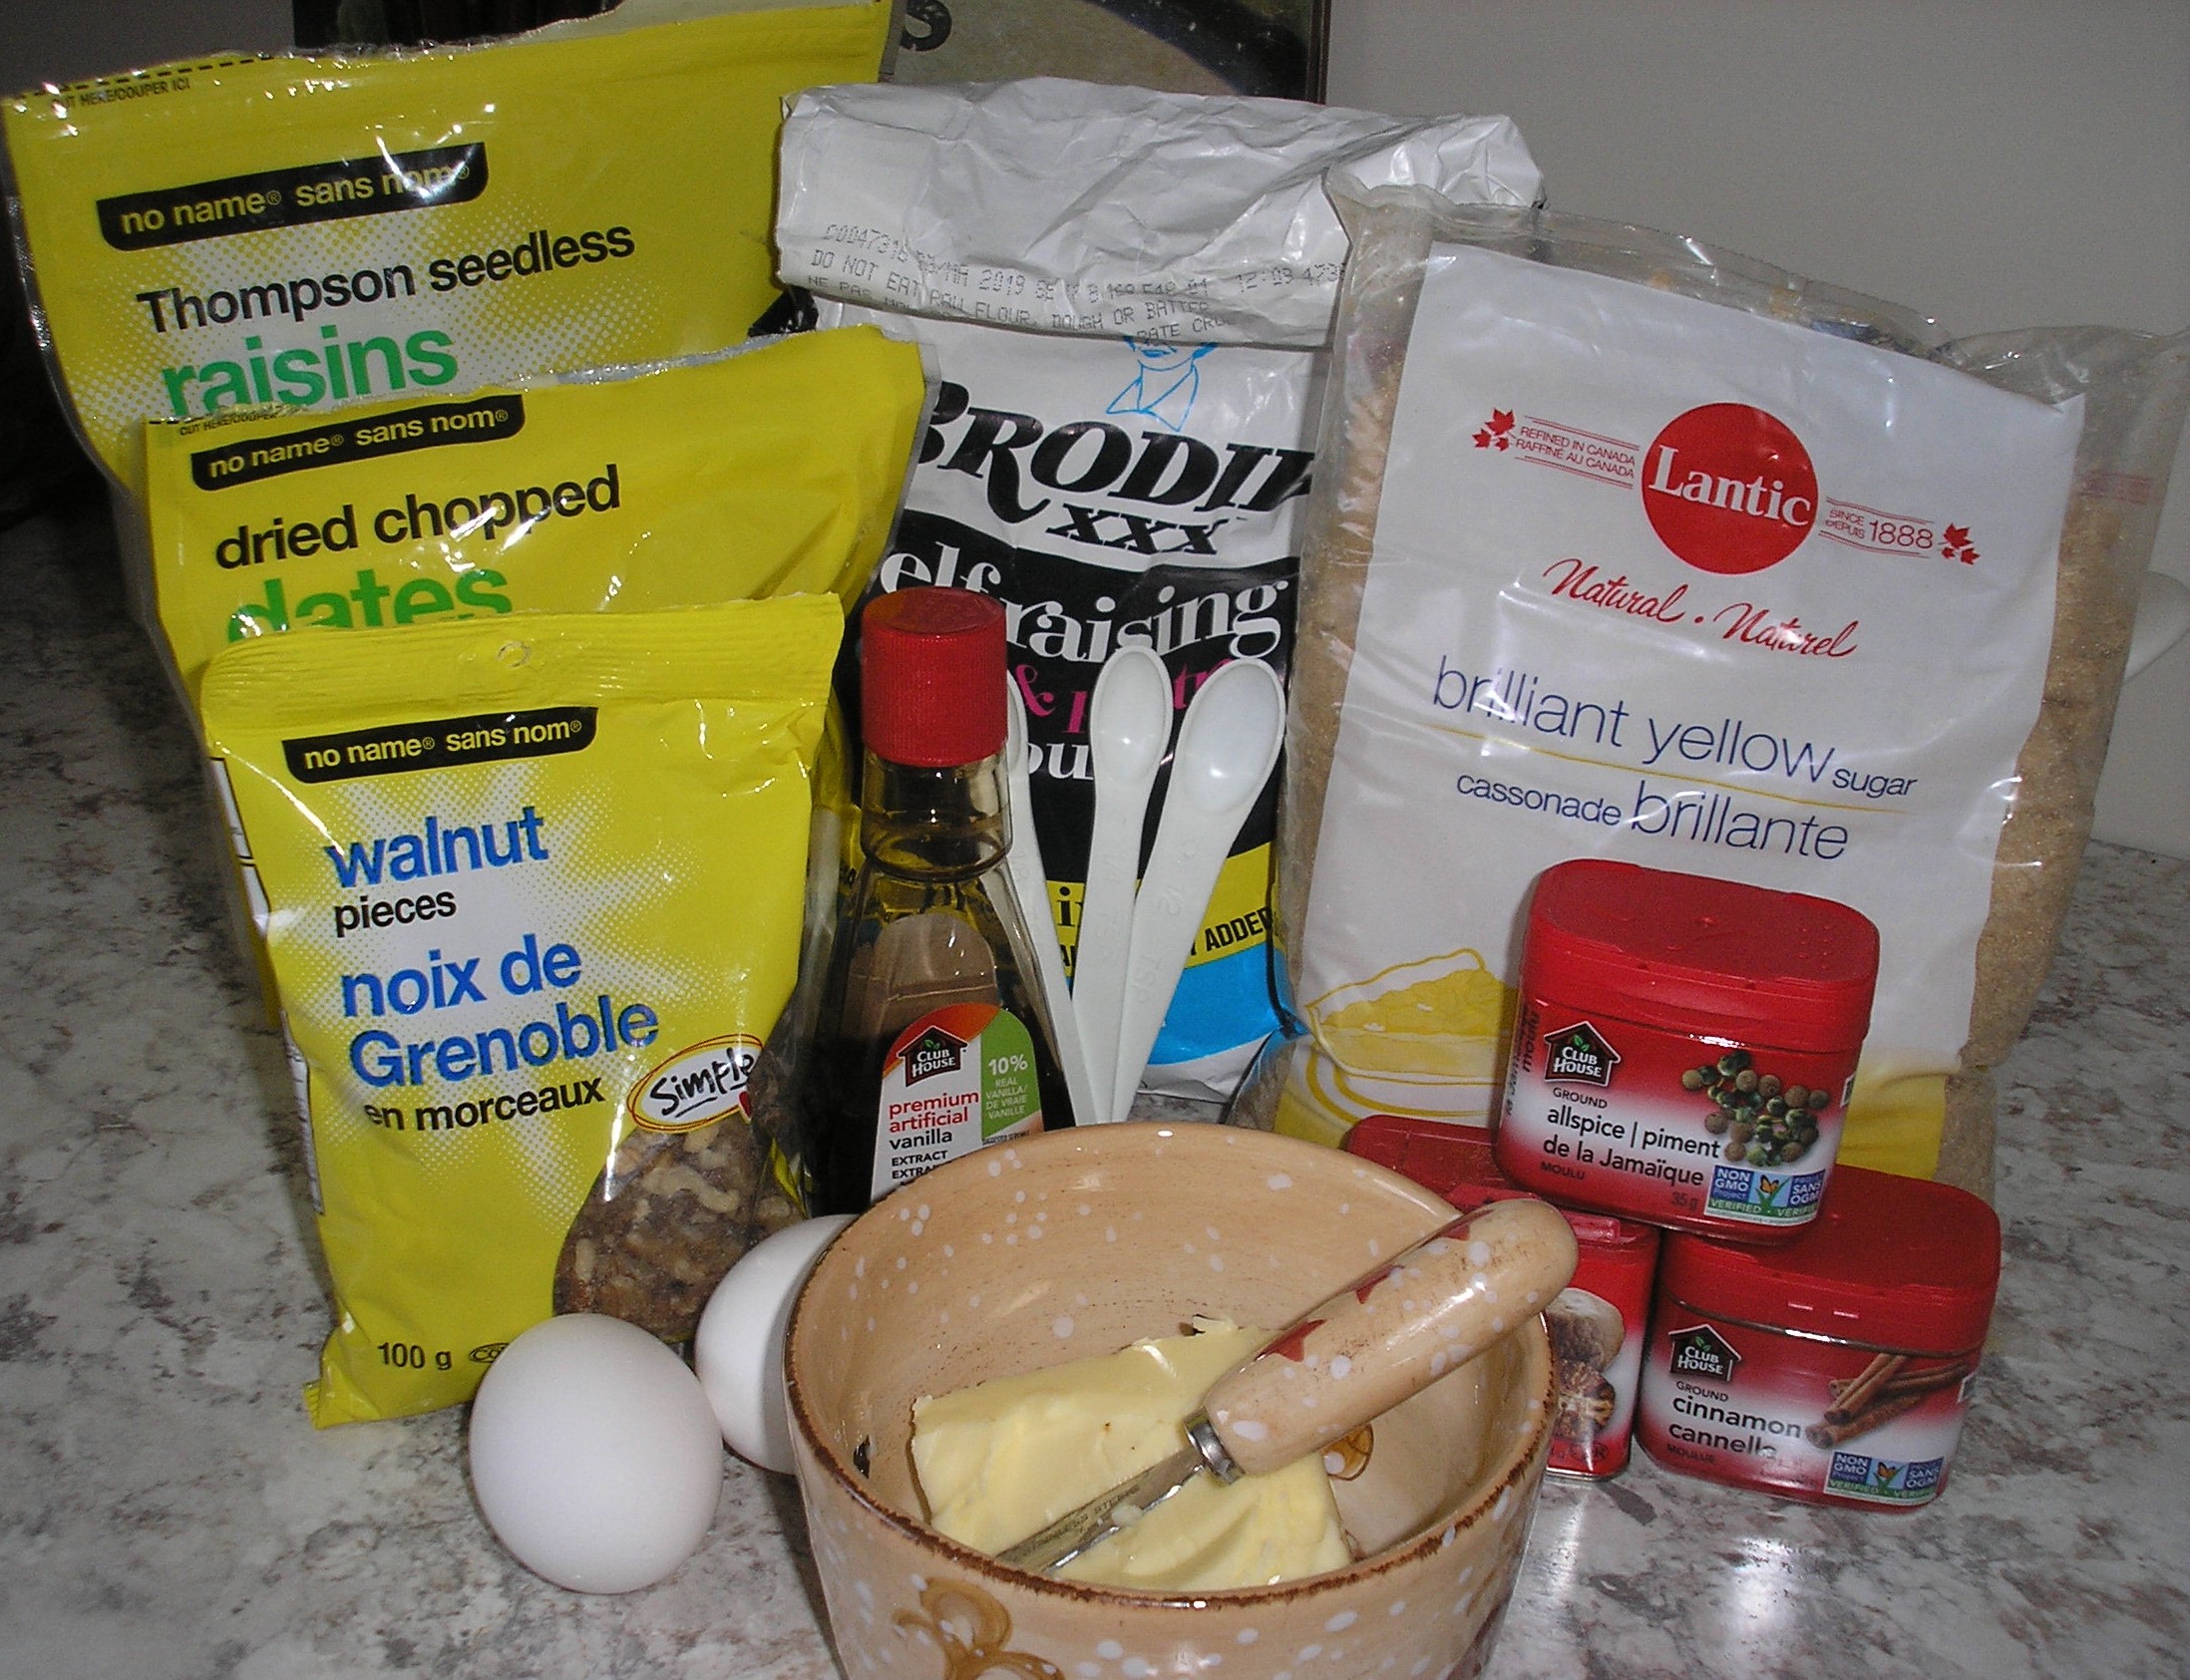
and the ingredients…nothing fancy, although this version includes dates.
I used butter instead of shortening, and not as much, 1/3 cup. My Allspice container said it was a mixture of cloves, cinnamon and nutmeg, but allspice can also be a spice (from a plant berry) on its own. If Allspice is not in your spice rack, Google has plenty of references for substitutes, including one on one cloves, but I find cloves strong, so best not to overdo it.
The finished product:
My mother was not much of a cookie baker, as my dad preferred pies and cakes, so I don’t remember her making these very often when I was growing up but I always enjoyed them when she did. (She was more likely to make peanut butter or chocolate chip). Back in the 1990’s, I worked at a rural hospital where the dietary department still made much of the hospital food from scratch. Hermits were often on the cafeteria menu for morning coffee break, as were scones and homemade cinnamon buns. I hadn’t had hermits in years, so imagine my delight on seeing them at the bakery in my local grocery store last year. They’re baked up fresh, although from a mix ordered in, according to one of the staff, and they have regular customers, mostly older folks like me who remember them from childhood.
Of the three versions I’ve sampled, they’ve all have been a bit different, mainly in the spices department, but I think the bakery’s is the best, and probably comparable in price to homemade, ($5.49 for 12 large cookies), nuts and raisins being fairly expensive here unless you go to one of those bulk bin places. The key is the right combination of spices. Despite buying two dozen from the bakery, we ran out before the next grocery run, so I had to resort to making them from scratch. Mine did not taste the same as the last time I made them but I suspect my nutmeg was too old. That would have required a trip to the store, and I’m more like a hermit crab these days, scurrying around doing my essential errands quickly so I can return to the safety of my own home.
Stay in your home and stay safe!
We all might be getting a little crabby these days from too much sheltering in place, but a sweet treat always helps! Remember to savor – according to the Petsmart website, hermit crabs take small bites and eat very slowly, usually at night. Enjoy!
Postscript: Do you have a favorite cookbook you use or may have inherited?


 Of the three versions I’ve sampled, they’ve all have been a bit different, mainly in the spices department, but I think the bakery’s is the best, and probably comparable in price to homemade, ($5.49 for 12 large cookies), nuts and raisins being fairly expensive here unless you go to one of those bulk bin places. The key is the right combination of spices. Despite buying two dozen from the bakery, we ran out before the next grocery run, so I had to resort to making them from scratch. Mine did not taste the same as the last time I made them but I suspect my nutmeg was too old. That would have required a trip to the store, and I’m more like a hermit crab these days, scurrying around doing my essential errands quickly so I can return to the safety of my own home.